> ## Documentation Index
> Fetch the complete documentation index at: https://www.cashfree.com/docs/llms.txt
> Use this file to discover all available pages before exploring further.
# Access Management
> Manage user access for your Cashfree Payments account: invite team members, assign roles, create custom permissions, and audit role-based access controls.
Access management allows you to control who can access your Cashfree Payments account and what actions they can perform. Use role-based access control to minimise security risks, maintain accountability, and ensure team members have appropriate permissions.
To access these features:
1. Log in to the [Merchant Dashboard](https://merchant.cashfree.com/auth/login).
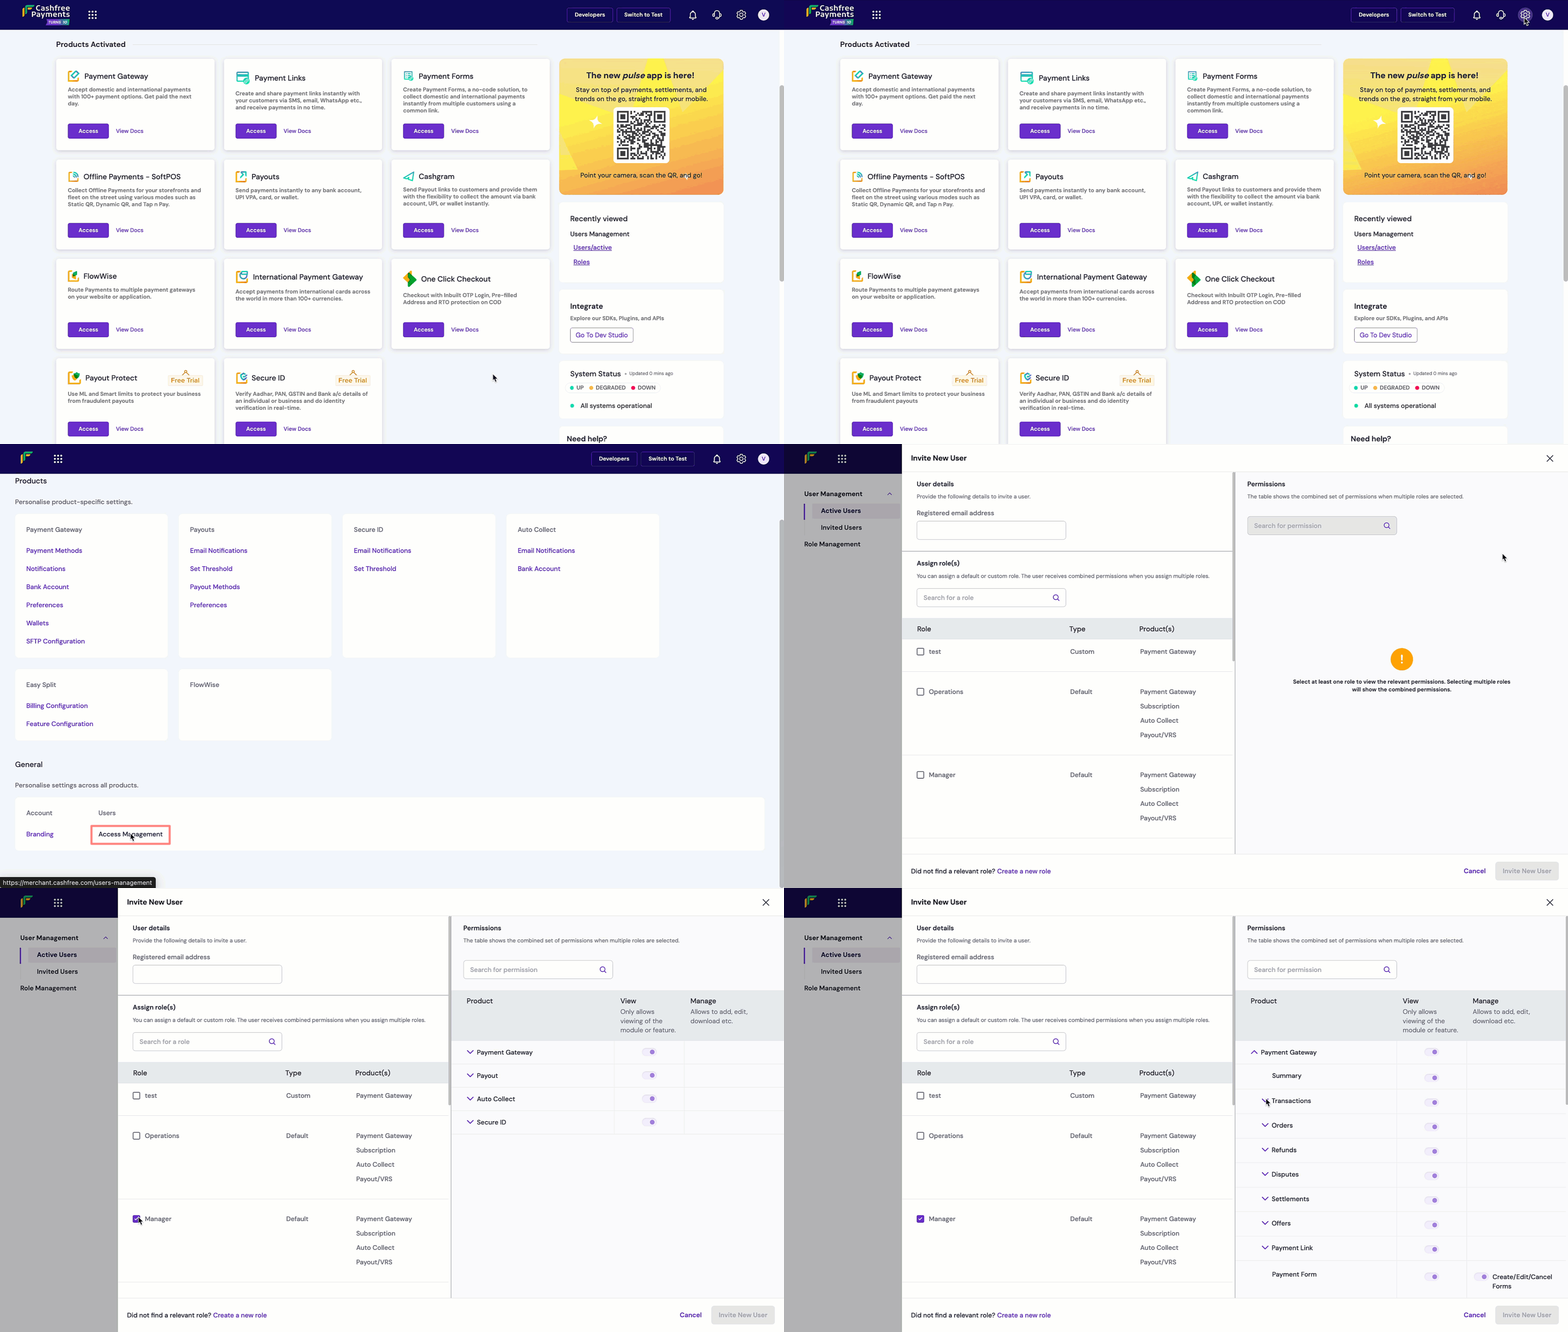
2. Navigate to **Settings > Access Management**.
You can assign predefined or custom roles, enable specific permissions without roles, combine multiple roles for a user, or create custom roles for your organisation's needs.
The system is built on three core components that work together to provide flexible and secure access control:
Invite team members, assign roles and permissions, and manage user access to your account.
Create custom roles with specific permission sets tailored to your organisation's needs.
Control what users can view and manage across all products and features.
## User management
User management allows you to invite team members to your Cashfree Payments account and control their access through role assignments or direct permission grants. You can invite unlimited users and assign them different access levels based on their responsibilities.
### Default roles
Cashfree Payments provides five default roles that cover common use cases. Each role includes a predefined set of permissions designed for specific responsibilities:
| Role | Description | Typical use cases |
| :--------- | :----------------------------------------------------------------------------------------------------------- | :-------------------------------------------------------------- |
| Developer | Develops and maintains integrations with access to API secrets, webhooks, and all API resources. | API integration, webhook configuration, SDK implementation. |
| Operations | Manages daily payment processing, ensures payouts, refunds payments, handles disputes, and exports data. | Transaction processing, refund management, dispute handling. |
| Manager | Manages overall business cash flow including settlements, payment methods, and reports. | Financial oversight, settlement monitoring, business analytics. |
| Admin | Oversees account settings, transactions, payouts, and settlements. Cannot manage users or roles. | System administration, merchant configuration, reporting. |
| Support | Provides technical assistance to customers and has view-only access to transactions, refunds, and transfers. | Customer support, transaction queries, read-only access. |
### Account owner
The account owner is the user who created the Cashfree Payments account. Unlike the five default roles, this is a system-level designation assigned automatically at account creation and can't be assigned through **User Management** on the Merchant Dashboard. Only one account owner can exist per account at any time.
Account deletion cannot be initiated from the [Merchant Dashboard](https://merchant.cashfree.com/auth/login). To request account deletion,
contact your account manager by email. Your account manager coordinates with
the Cashfree care team to process the deletion request.
#### Transferring account ownership
Account ownership can be transferred to another user on the account. Once transferred, the new user assumes all account owner permissions and the previous owner loses them.
To transfer account ownership, contact [Cashfree support](https://merchant.cashfree.com/merchants/landing?env=prod\&raise_issue=1) or reach out to your Cashfree Payments account manager with the request to transfer account ownership to the registered email address of the user you want.
The following table shows what the account owner and each default role can access. Use this to understand which role best fits your team member's responsibilities:
| Feature | Account owner | Admin | Manager | Developer | Operations | Support |
| :--------------------- | :------------ | :---------- | :---------- | :---------- | :---------- | :-------- |
| **API Keys & Secrets** | Full access | Full access | No access | Full access | No access | No access |
| **Webhooks** | Full access | Full access | No access | Full access | No access | No access |
| **Orders & Payments** | Full access | Full access | View only | View only | Full access | View only |
| **Refunds** | Full access | Full access | View only | No access | Full access | View only |
| **Settlements** | Full access | Full access | Full access | No access | View only | No access |
| **Disputes** | Full access | Full access | View only | No access | Full access | View only |
| **Payouts** | Full access | Full access | Full access | No access | Full access | View only |
| **Payment Methods** | Full access | Full access | Full access | No access | No access | No access |
| **Reports** | Full access | Full access | Full access | View only | Full access | View only |
| **User Management** | Full access | No access | No access | No access | No access | No access |
| **Role Management** | Full access | No access | No access | No access | No access | No access |
| **Account Settings** | Full access | Full access | View only | No access | No access | No access |
* **Full access**: Can view and modify (create, edit, delete, configure)
* **View only**: Can see information but can't make changes
* **No access**: Can't view or access this feature
### Invite a user and assign a role
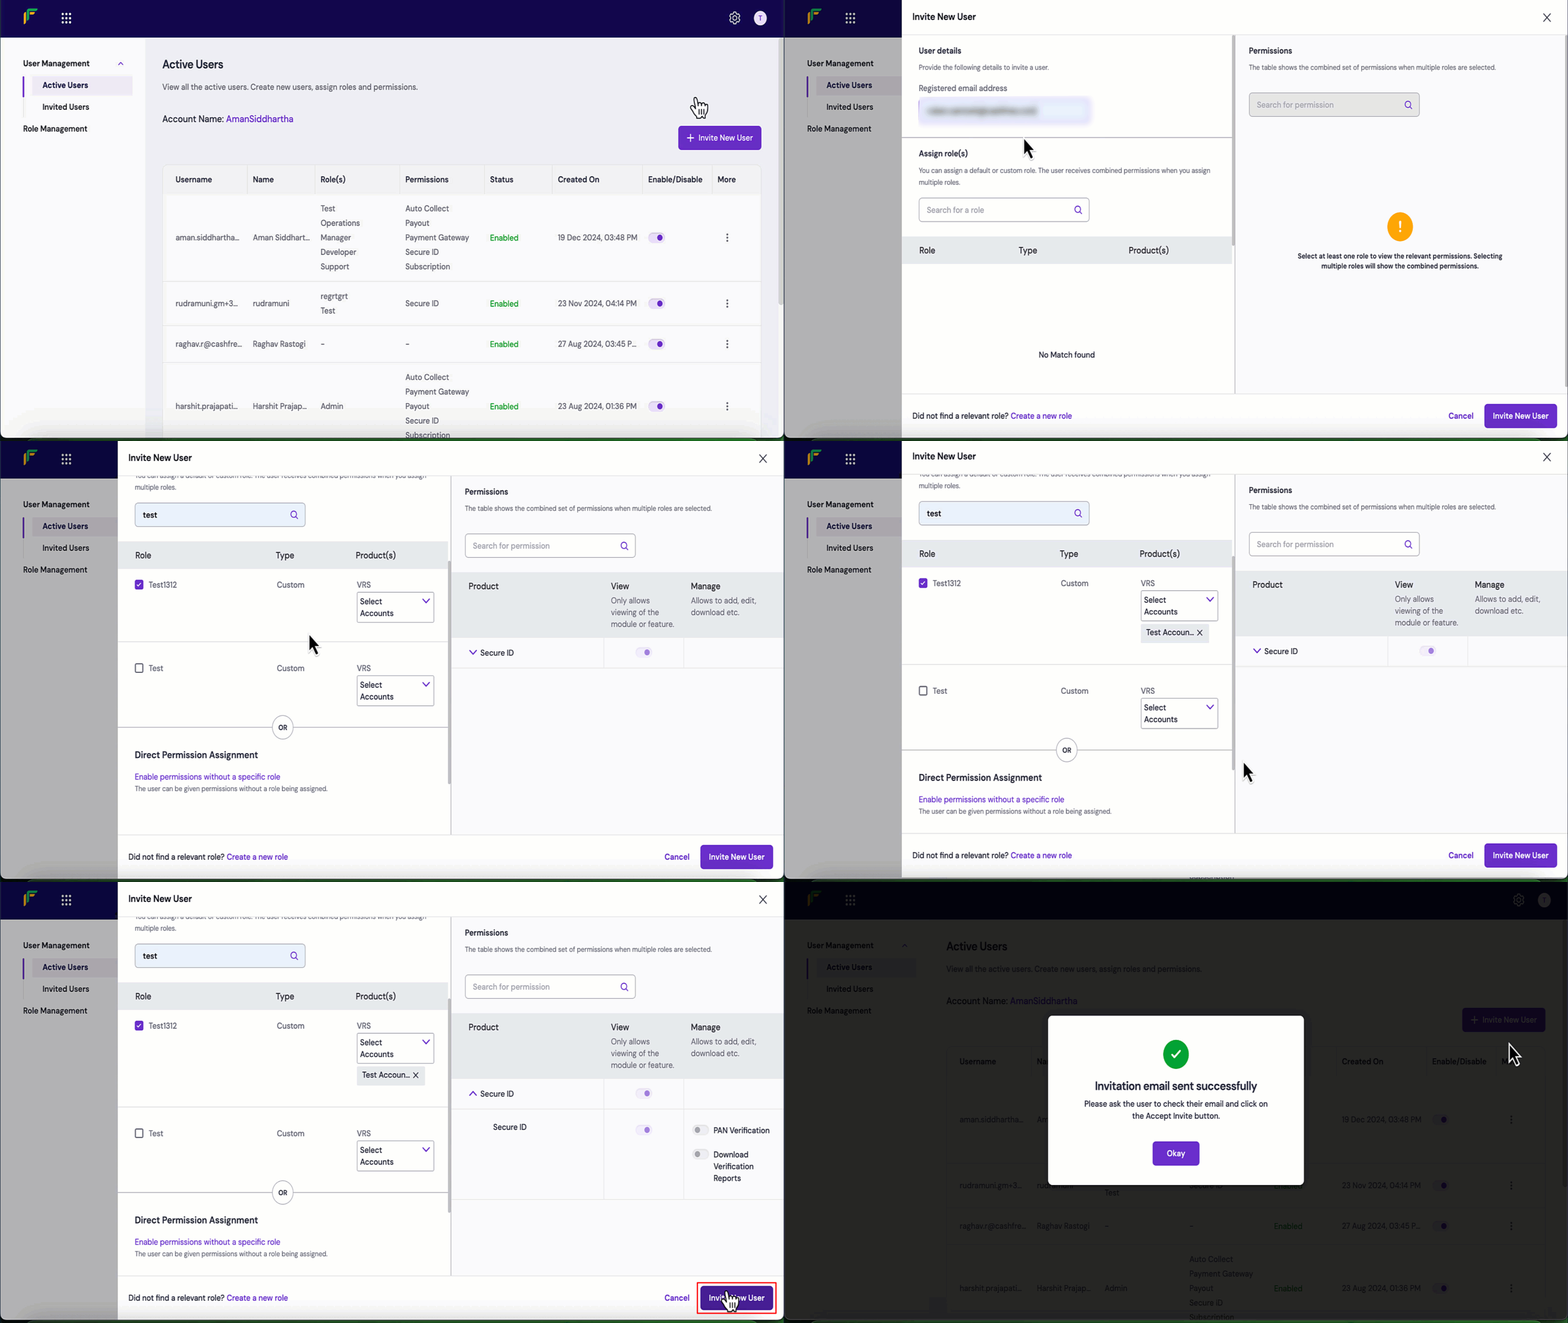
Follow these steps to invite a user and assign one or more roles:
1. Log in to the [Merchant Dashboard](https://merchant.cashfree.com/auth/login).
2. Navigate to **Settings > Access Management > User Management**.
3. Select **Invite New User**.
4. Enter the email address of the user in the **Registered email address** field under **User details**.
5. In the **Assign roles** section, select the roles you want to assign:
* **Default roles**: Select any of the five default roles (Developer, Operations, Manager, Admin, Support)
* **Custom roles**: Select any custom roles you have created in the Role Management section
6. Review the permissions displayed in the **Permissions** section. When multiple roles are assigned, the permissions are combined.
7. Select **Invite New User**.
The user receives an invitation email and appears in the **Invited Users** list until they accept the invitation.
Assigning multiple roles
You can assign multiple roles to a user by selecting multiple role checkboxes. The **Permissions** section displays the combined permissions of all selected roles, making it easy to review the total access granted.
### Invite a user with direct permissions
You can invite users and enable specific permissions without assigning a formal role. This approach is useful for providing temporary access to specific features or when a user's responsibilities don't align with existing roles.
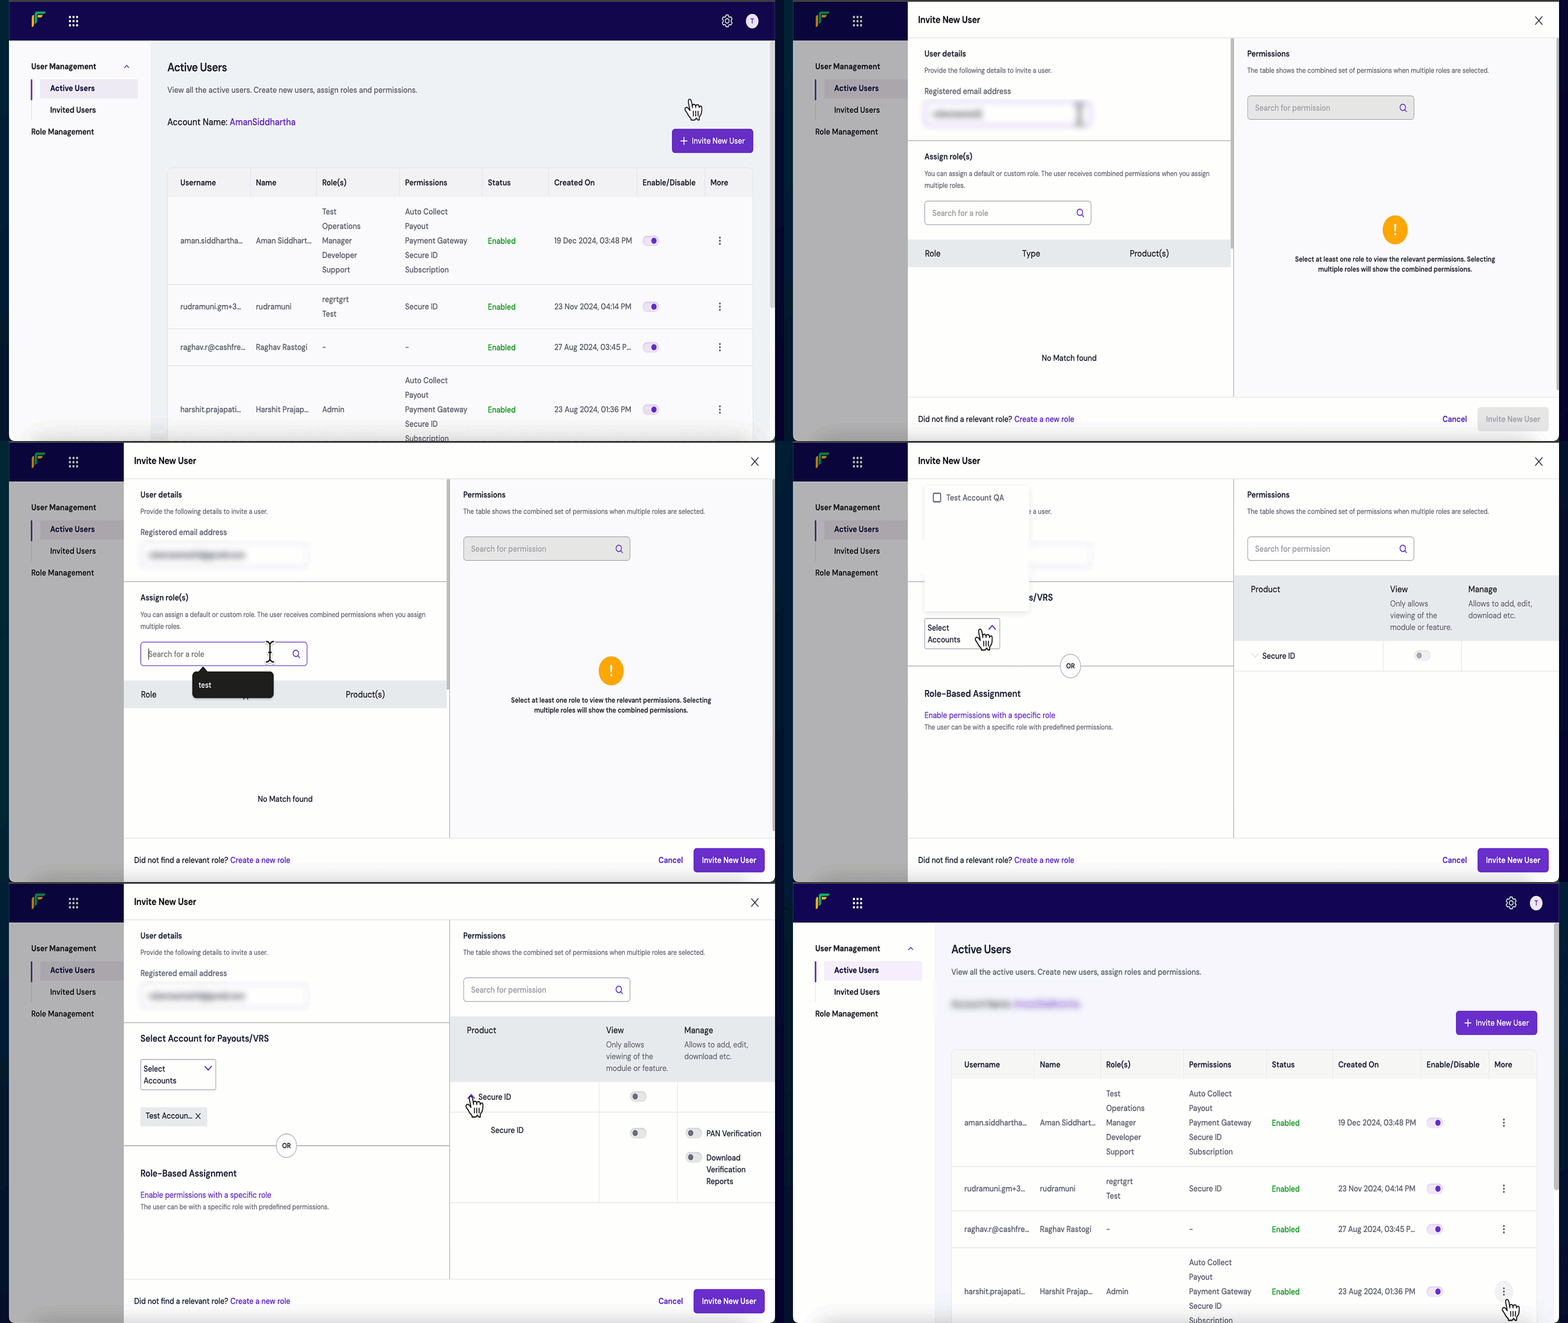
Follow these steps to invite a user and assign direct permissions:
1. Log in to the [Merchant Dashboard](https://merchant.cashfree.com/auth/login).
2. Navigate to **Settings > Access Management > User Management**.
3. Select **Invite New User**.
4. Enter the email address of the user in the **Registered email address** field under **User details**.
5. Scroll down to the **Direct Permission Assignment** section and select **Enable permissions without a specific role**.
6. Use the **Select Account for Payouts or VRS** dropdown to select the accounts the user can access (if applicable).
7. Configure permissions in the **Permissions** section:
* **Search for a permission**: Use the search bar to find specific permissions
* **Product dropdown**: Navigate through different products and features
* **View toggle**: Enable or disable view-only access to modules or features
* **Manage toggle**: Enable or disable full access (add, edit, download, delete)
8. Select **Invite New User**.
The user receives an invitation email and appears in the **Invited Users** list.
### Manage existing users
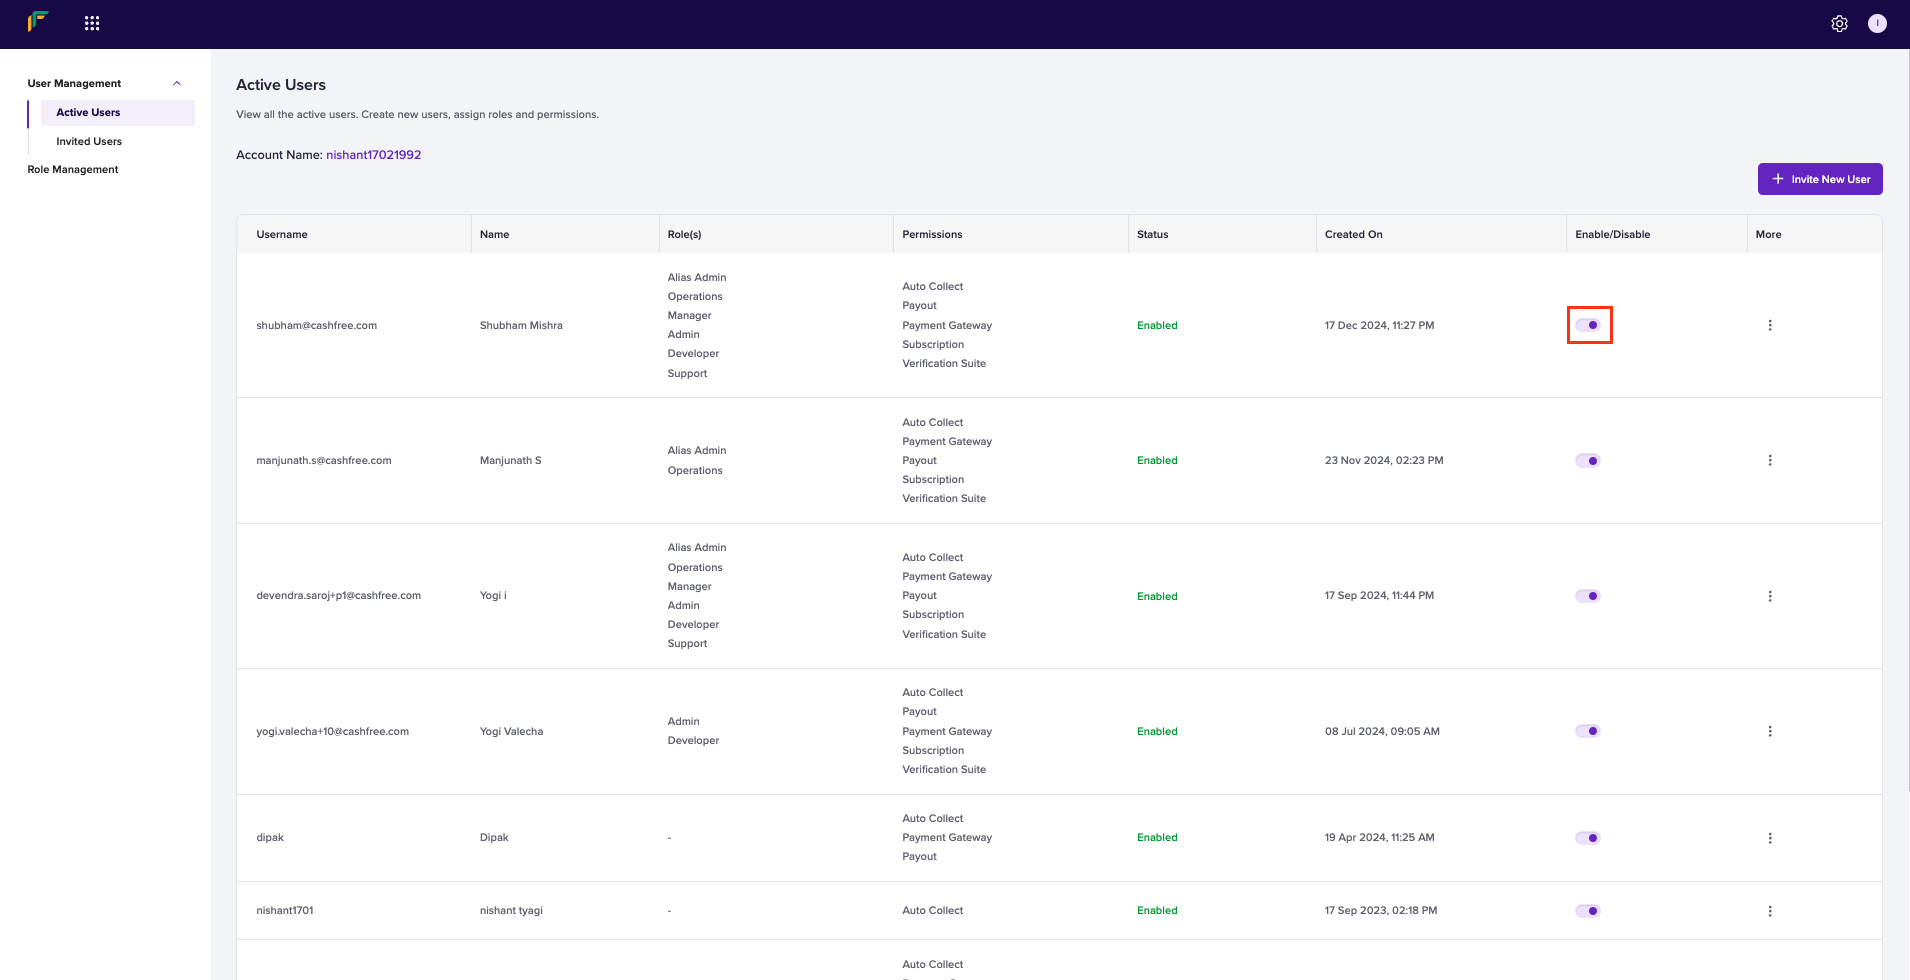
The **User Management** screen displays all active and invited users in your account. You can enable or disable users, edit their permissions, and remove users when necessary.
The user management table displays the following information:
* **User email**: The email address of the user
* **Roles**: The roles assigned to the user
* **Status**: Active or Invited status
* **Enable or disable toggle**: Enable or disable user access
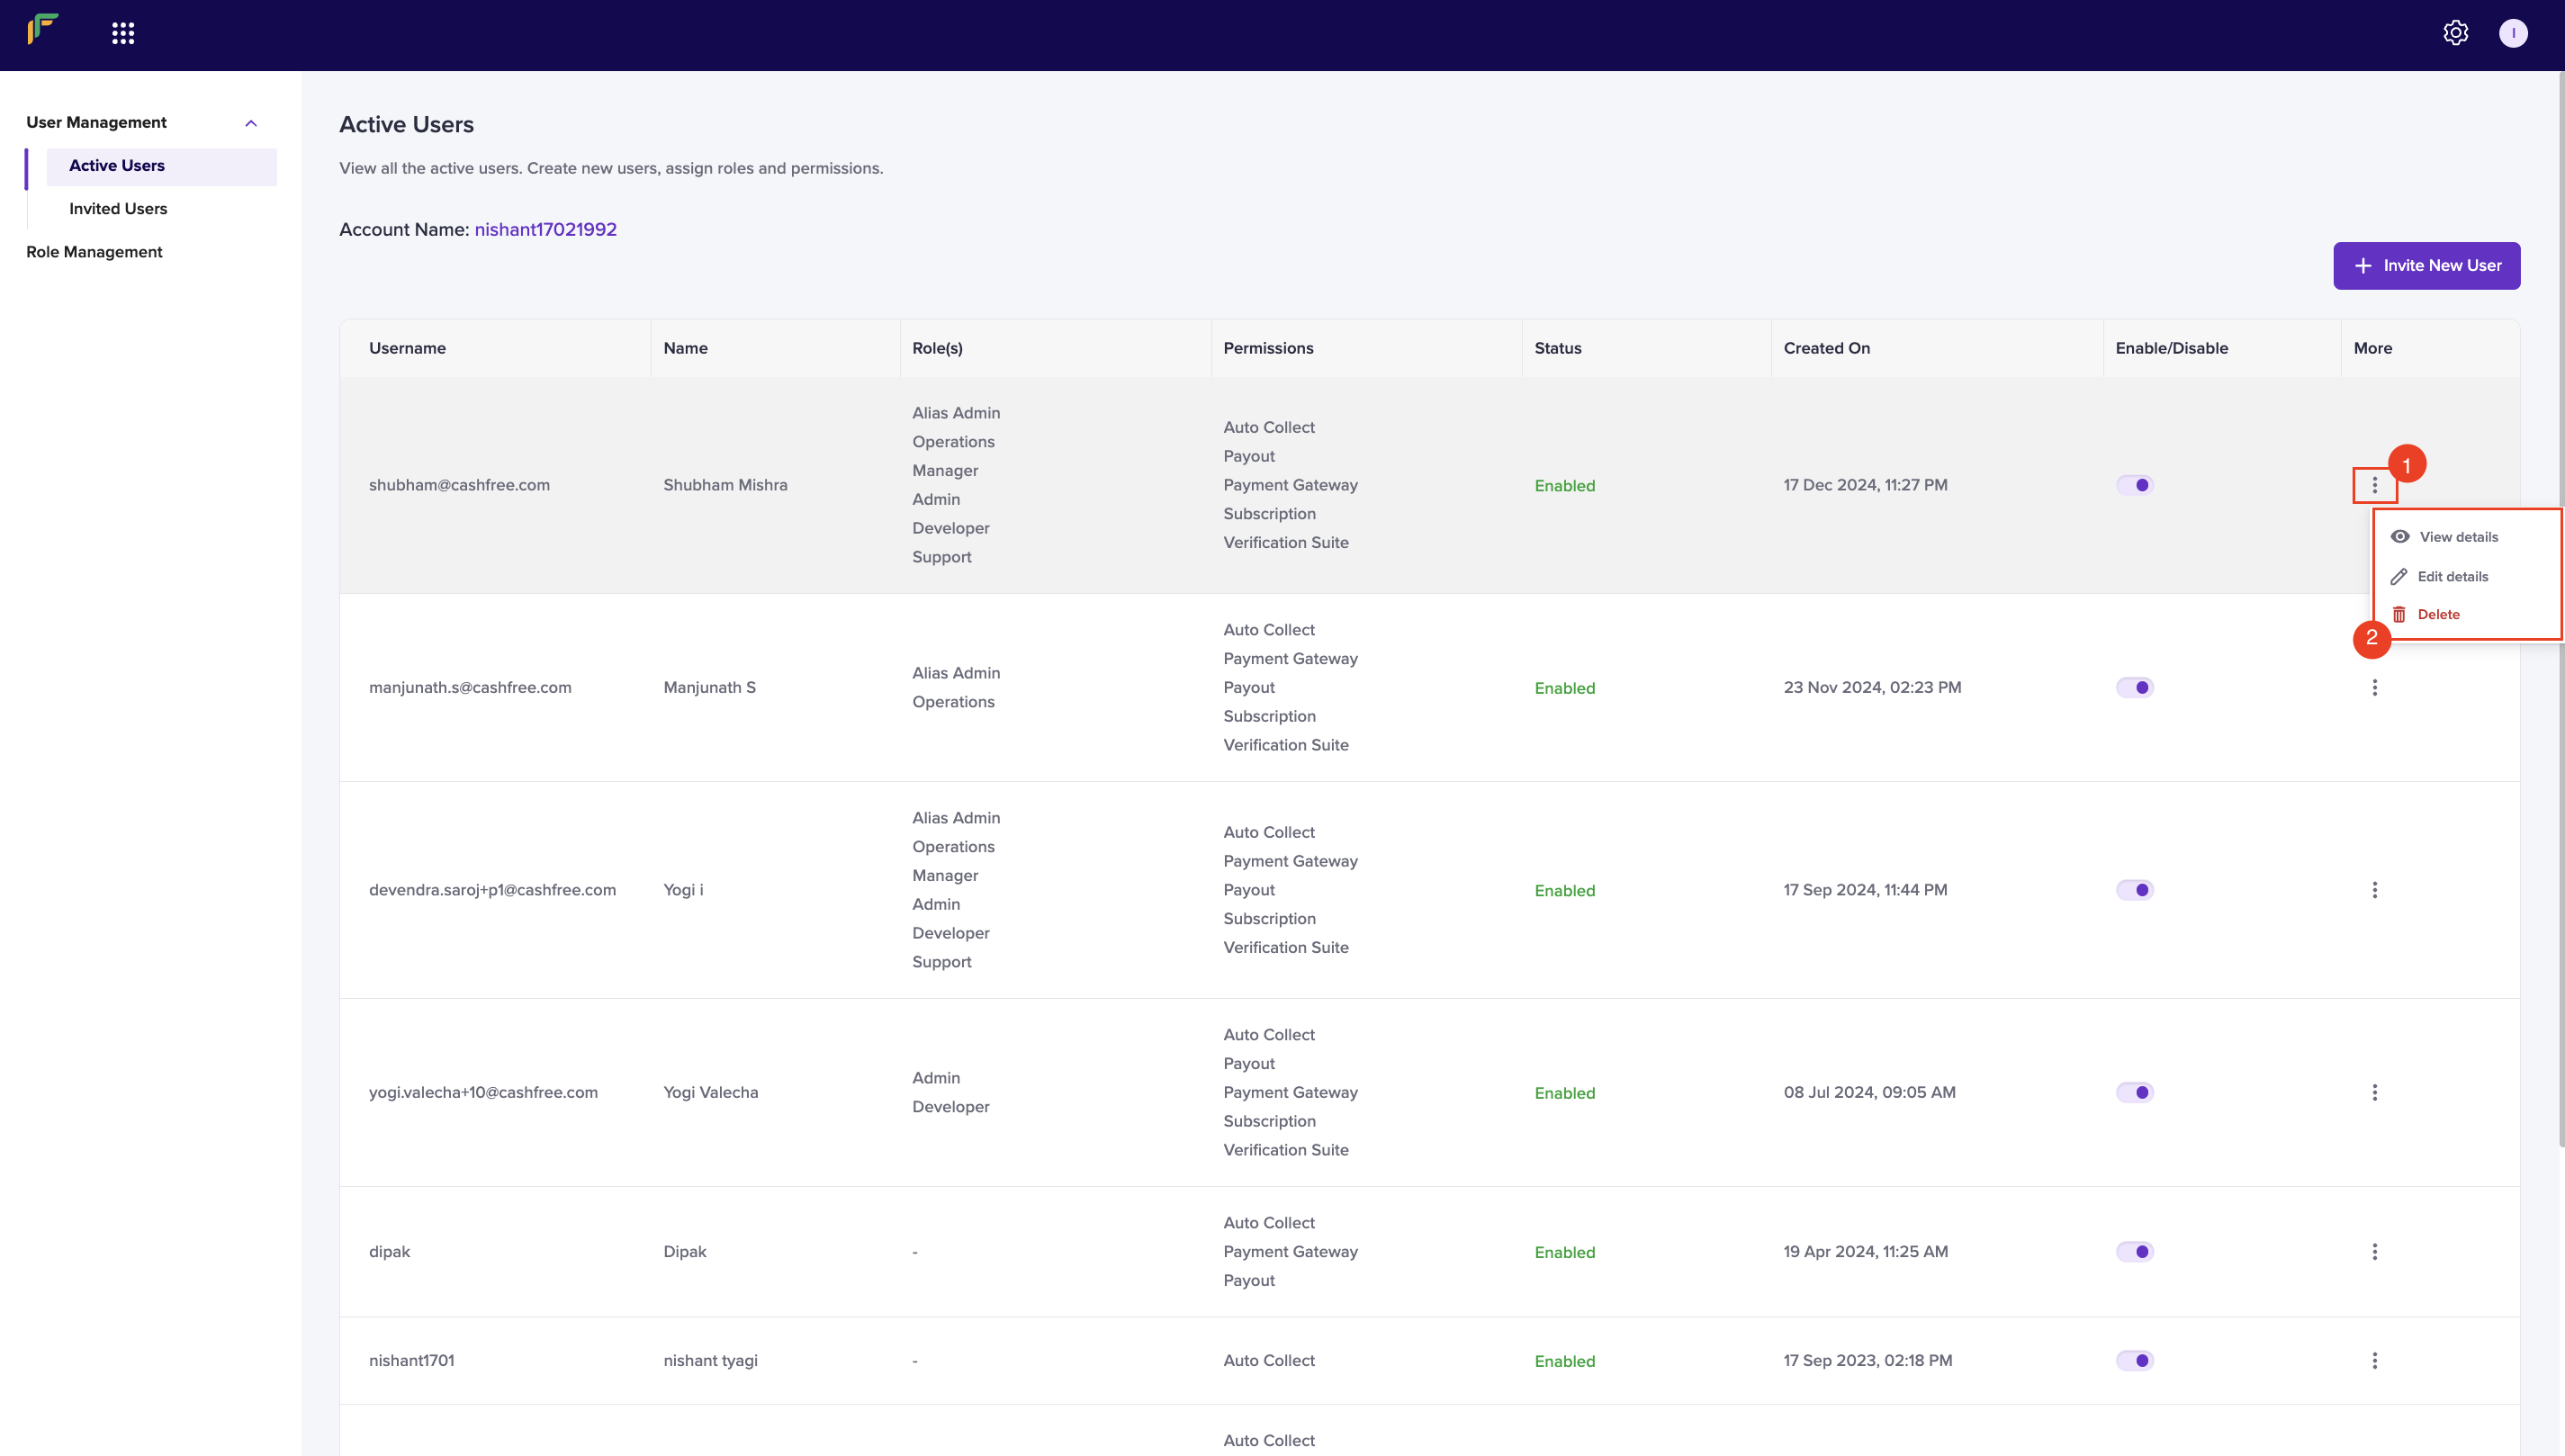
To modify a user's roles or permissions:
1. Log in to the [Merchant Dashboard](https://merchant.cashfree.com/auth/login).
2. Navigate to **Settings > Access Management > User Management**.
3. Locate the user in the table and select the ellipsis (⋮) icon.
4. Select **Edit details**.
5. In the **Update Details** popup, modify the roles or permissions as needed.
6. Select **Update User**.
To temporarily disable a user:
1. Locate the user in the **User Management** table.
2. Use the **Enable or disable** toggle to disable the user.
The user retains their configuration but can't access the dashboard until re-enabled.
To permanently delete a user:
1. Locate the user in the **User Management** table and select the ellipsis (⋮) icon.
2. Select **Delete**.
3. Confirm the deletion.
Deleting users
Deleting a user is permanent and can't be undone. The user must be re-invited if access is needed in the future.
### View user details
To view comprehensive details about a user's roles and permissions:
1. Log in to the [Merchant Dashboard](https://merchant.cashfree.com/auth/login).
2. Navigate to **Settings > Access Management > User Management**.
3. Locate the user in the table and select the ellipsis (⋮) icon.
4. Select **View details**.
The details popup displays the user's email, assigned roles, and all enabled permissions.
## Role management
Beyond the five default roles, you can create custom roles with specific permission sets tailored to your organisation's needs. Custom roles enable you to define precise access levels for specialised team functions that don't align with the default roles.
### Create a custom role
You can create roles that grant access to specific features or products. For example, you can create a role that allows users to view Payment Gateway orders but nothing beyond that, or a role that provides full access to payouts but read-only access to payments.
Follow these steps to create a custom role:
1. Log in to the [Merchant Dashboard](https://merchant.cashfree.com/auth/login).
2. Navigate to **Settings > Access Management > Role Management**.
3. Select **New Role**.
4. Enter the following information in the **Create New Role** popup:
* **Role**: Enter a descriptive name for the role (for example, "Payment Gateway Viewer" or "Payout Manager")
* **Description**: Provide a clear description of the role's purpose and intended use
5. Configure permissions using the permissions table:
* **Search for a permission**: Use the search bar to find specific permissions
* **Product dropdown**: Navigate through different products and features
* **View toggle**: Enable permissions that allow users to view modules or features
* **Manage toggle**: Enable permissions that allow users to add, edit, download, or delete
6. Select **Create New Role**.
The role is created and appears in the **Role Management** screen. You can now assign this role to users in the User Management section.
### Manage custom roles
Once you have created custom roles, you can edit or delete them as your organisation's needs change.
To modify an existing custom role:
1. Log in to the [Merchant Dashboard](https://merchant.cashfree.com/auth/login).
2. Navigate to **Settings > Access Management > Role Management**.
3. Locate the role in the table and select the ellipsis (⋮) icon.
4. Select **Edit role**.
5. Update the role name, description, or permissions as needed.
6. Select **Update Role**.
Changes to a role apply immediately to all users assigned that role.
To delete a custom role:
1. Log in to the [Merchant Dashboard](https://merchant.cashfree.com/auth/login).
2. Navigate to **Settings > Access Management > Role Management**.
3. Locate the role in the table and select the ellipsis (⋮) icon.
4. Select **Delete**.
5. Confirm the deletion.
Deleting roles
Before deleting a role, ensure that no active users are assigned to it. If users are currently assigned to the role, you must reassign them to a different role or remove the role assignment before deletion.
## Permissions framework
The permissions framework provides granular control over what users can view and manage across all Cashfree Payments products and features. Understanding how permissions work helps you create effective roles and grant appropriate access to your team members.
### How to access permissions
Permissions appear in the Merchant Dashboard when you work with users and roles:
* **When inviting or editing users**:
1. Navigate to **Settings > Access Management > User Management**
2. Select **Invite New User** or edit an existing user
3. The **Permissions** section displays all enabled permissions based on assigned roles or direct permission grants
* **When creating or editing roles**:
1. Navigate to **Settings > Access Management > Role Management**.
2. Select **New Role** or edit an existing role.
3. Use the permissions table to configure View and Manage permissions for each product and feature.
* **When viewing user details**:
1. Navigate to **Settings > Access Management > User Management**.
2. Select the ellipsis (⋮) icon next to a user and choose **View details**.
3. The popup displays all permissions currently enabled for that user.
### Permission levels
Each feature in the dashboard supports two permission levels:
* **View**: Allows users to view information but not make changes. Users can access dashboards, view transactions, download reports, and see configuration settings.
* **Manage**: Provides full access to add, edit, download, delete, and configure features. This level includes all View permissions plus the ability to make changes.
**Multiple roles and permissions**
When a user has multiple roles or direct permissions, all permissions are combined (additive). The highest permission level applies (Manage overrides View). Learn more about [permission conflicts](#why-does-a-user-have-more-or-less-access-than-expected).
**Permission scope**
Permissions are organised by product category (Payment Gateway, Payouts, Secure ID, Subscriptions, Settings, Reports). The specific features available within each product can be viewed in the permissions interface when inviting users or creating roles.
### Account-specific permissions
For products like Payouts and Virtual Account Services, you can grant permissions for specific accounts rather than all accounts. This allows you to:
* Limit users to specific business units or brands
* Provide segregated access in multi-account setups
* Control access to specific fund sources or settlement accounts
## Best practices
Follow these recommendations to implement secure and effective access management:
* **Principle of least privilege**: Grant users only the permissions they need to perform their job functions
* **Regular access reviews**: Periodically review user access and remove permissions that are no longer required
* **Disable inactive users**: Disable or delete user accounts for team members who no longer require access
* **Use role-based access**: Prefer role-based assignments over direct permissions for easier management and consistency
* **Create focused roles**: Design roles for specific job functions rather than broad access levels
* **Use descriptive names**: Name roles clearly to indicate their purpose (for example, "Finance Viewer" instead of "Role 1")
* **Document role purposes**: Use the description field to explain when and why to use each role
* **Review before assigning**: Always review the combined permissions before assigning multiple roles
* **Verify email addresses**: Ensure user email addresses are correct before sending invitations
* **Communicate with users**: Inform users when you grant or change their access
* **Monitor login activity**: Use the login history feature to track user access patterns
* **Require 2FA**: Enable two-factor authentication for all users accessing the dashboard
* **Separate duties**: Assign different responsibilities to different users to maintain checks and balances
* **Use approval workflows**: For payouts, assign Initiator and Approver roles to different users
* **Maintain audit trails**: Keep records of who has access to what and when changes are made
* **Test before production**: Test new roles or permission changes with a single user before broad deployment
## FAQs
For more information and answers to common questions about access management, refer to the [Access Management FAQs](/help/account/access-management-faqs).
 ### Manage existing users
The **User Management** screen displays all active and invited users in your account. You can enable or disable users, edit their permissions, and remove users when necessary.
### Manage existing users
The **User Management** screen displays all active and invited users in your account. You can enable or disable users, edit their permissions, and remove users when necessary.
 ### Permission levels
Each feature in the dashboard supports two permission levels:
* **View**: Allows users to view information but not make changes. Users can access dashboards, view transactions, download reports, and see configuration settings.
* **Manage**: Provides full access to add, edit, download, delete, and configure features. This level includes all View permissions plus the ability to make changes.
### Permission levels
Each feature in the dashboard supports two permission levels:
* **View**: Allows users to view information but not make changes. Users can access dashboards, view transactions, download reports, and see configuration settings.
* **Manage**: Provides full access to add, edit, download, delete, and configure features. This level includes all View permissions plus the ability to make changes.