> ## Documentation Index
> Fetch the complete documentation index at: https://www.cashfree.com/docs/llms.txt
> Use this file to discover all available pages before exploring further.
# Get Started with Offline Payments
> Set up Cashfree Offline Payments in four steps: activate the product, configure collection points, complete KYC, and start accepting payments via softPOS.
Before you can accept in-person payments with Cashfree Offline Payments, you need to activate the product on your Merchant Dashboard, configure your collection points, and complete KYC verification for each point.
## Step 1: Activate Offline Payments
Ensure that you have an active Cashfree Payment Gateway account, then request Offline Payments activation from the Merchant Dashboard.
Log in to the [Merchant Dashboard](https://merchant.cashfree.com/auth/login), then go to **Offline Payments**.
Click **Request Activation**. This sends an activation request to your Cashfree account manager.
You will receive an email confirmation once your account manager activates Offline Payments.
## Step 2: Select a collection point
To add a collection point, open **Offline Payments** in the Merchant Dashboard then navigate to **Collection Point Management** and click **Add a Collection Point**.
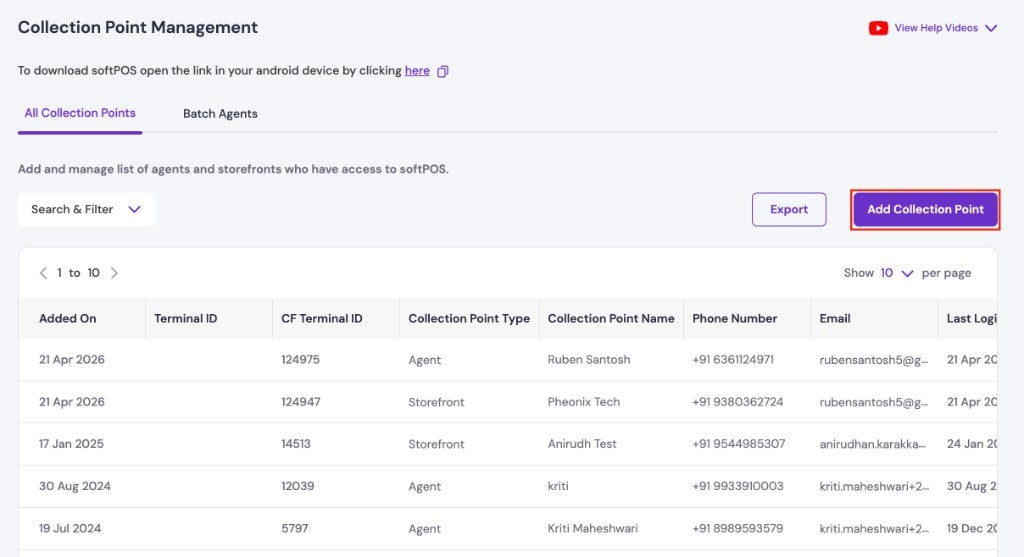 Select the collection point type that matches your business needs:
Use this model if you operate one or more physical store locations and want customers to scan a static QR code to pay at the counter, with funds credited directly to your account.
Use this model if your staff or agents collect payments on your behalf at the point of service, such as at a customer's doorstep or table, with funds credited directly to your account.
Use this model if you need to track payments at the individual customer level, such as for loan repayments, fee collection, or recurring charges.
## Step 3: Set up your collection points
Cashfree must verify each collection point before you can start collecting payments. Follow the respective setup steps according to your selected collection point type:
* [Storefront setup](/payments/softpos/collection-point-setup#storefront-setup)
* [Agent setup](/payments/softpos/collection-point-setup#agent-setup)
* [Customer VPA setup](/payments/softpos/collection-point-setup#customer-vpa-setup)
Each collection point must reach **Active** status before you can start collecting payments.
## Step 4: Start collecting payments via agents
Agents can begin accepting payments through the [softPOS application](/payments/softpos/agent-collection-mode#install-and-log-in-to-the-softpos-application), a mobile app for Android devices that supports QR codes, payment links, and more.
For instructions on setting up static and dynamic QR codes, payment links, and payment limits, see [agent collection point](/payments/softpos/agent-collection-mode).
All transactions, cash and digital, are visible in a single dashboard. See [settlements and reports](/payments/softpos/settlements-reports) to understand how and when funds are transferred to your bank account.
Select the collection point type that matches your business needs:
Use this model if you operate one or more physical store locations and want customers to scan a static QR code to pay at the counter, with funds credited directly to your account.
Use this model if your staff or agents collect payments on your behalf at the point of service, such as at a customer's doorstep or table, with funds credited directly to your account.
Use this model if you need to track payments at the individual customer level, such as for loan repayments, fee collection, or recurring charges.
## Step 3: Set up your collection points
Cashfree must verify each collection point before you can start collecting payments. Follow the respective setup steps according to your selected collection point type:
* [Storefront setup](/payments/softpos/collection-point-setup#storefront-setup)
* [Agent setup](/payments/softpos/collection-point-setup#agent-setup)
* [Customer VPA setup](/payments/softpos/collection-point-setup#customer-vpa-setup)
Each collection point must reach **Active** status before you can start collecting payments.
## Step 4: Start collecting payments via agents
Agents can begin accepting payments through the [softPOS application](/payments/softpos/agent-collection-mode#install-and-log-in-to-the-softpos-application), a mobile app for Android devices that supports QR codes, payment links, and more.
For instructions on setting up static and dynamic QR codes, payment links, and payment limits, see [agent collection point](/payments/softpos/agent-collection-mode).
All transactions, cash and digital, are visible in a single dashboard. See [settlements and reports](/payments/softpos/settlements-reports) to understand how and when funds are transferred to your bank account.