> ## Documentation Index
> Fetch the complete documentation index at: https://www.cashfree.com/docs/llms.txt
> Use this file to discover all available pages before exploring further.
# Create Cashgram
> Create and send Cashfree Cashgrams to beneficiaries from the Payouts Dashboard or APIs, with single and batch upload options for faster bulk disbursements.
You can create Cashgrams from your Payouts Dashboard or through the APIs. Before creating a Cashgram, ensure you have sufficient balance in your Payouts Account. The specified amount will be deducted from your account and sent to your beneficiaries.
You can't edit active Cashgrams, but you can deactivate them.
## Create a Cashgram
You can create individual Cashgrams through the Payouts Dashboard for targeted payouts to specific beneficiaries.
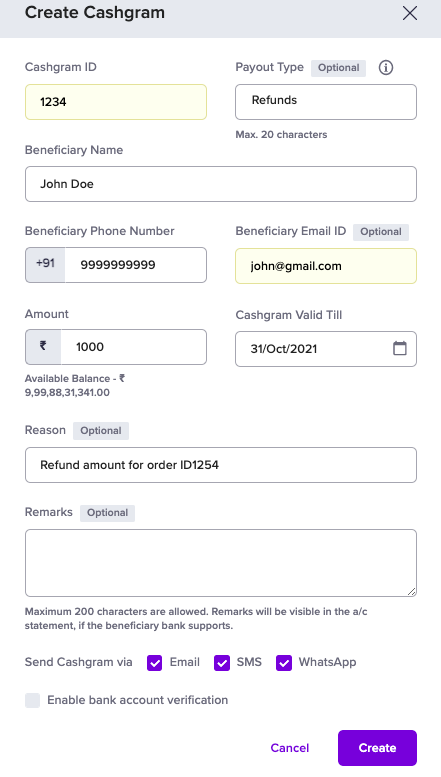
To create a Cashgram:
1. Log in to the [Merchant Dashboard](https://merchant.cashfree.com/auth/login).
2. Go to **Payouts Dashboard** > **Cashgram** > click **Create Cashgram**.
3. Enter the **Cashgram ID** and specify the **Payout Type**. Refunds, Reimbursements, and Rewards payout types are available by default. You can specify any other payout type according to your requirement.
4. Enter the **Beneficiary Name**, **Beneficiary Phone Number**, **Beneficiary Email ID**, and the **Amount** to be transferred. The Cashgram ID helps you track the Cashgram status.
5. In the **Cashgram Valid Till** field, specify the date until which the Cashgram link should remain valid. The link won't be valid beyond this date.
6. Enter the **Reason** and **Remarks**. The remarks will be visible in the beneficiary account statement if their bank supports it.
7. In the **Send Cashgram via** field, select how you want to notify the beneficiary. Email, SMS, and WhatsApp notifications are supported.
8. Click **CREATE**. The Cashgram link is created and sent to the beneficiary. The beneficiary can access the link and provide the required details to receive the amount.
 You can also use the API to [create Cashgrams](/api-reference/payouts/v1/create-cashgram).
## Batch upload cashgrams
Use the Batch Upload feature to create and send Cashgrams to multiple beneficiaries simultaneously. You must add all required details in a single file according to the required format and upload it in the Batch Upload section. Download the sample file to understand what information is required in the batch upload.
To upload a batch file:
1. Log in to the [Merchant Dashboard](https://merchant.cashfree.com/auth/login).
2. Go to **Payouts Dashboard** > **Cashgram** > **Batch** > click **Upload File**.
3. Click **Choose a File** to select the file you want to upload and then select **Upload**. The uploaded file will be visible in the **Batch** section.
4. Click on the file to view the individual Cashgram details uploaded in the file.
* Maximum file size allowed is 5 MB, and a maximum of 10,000 records can be
included in the file. - The file can't be uploaded if it's not according to the
suggested format. Also, if there are any errors in the uploaded file, you must
resolve all the errors and upload the file again.
You can view the status of the uploaded files and also download them to view more details.
You can also use the API to [create Cashgrams](/api-reference/payouts/v1/create-cashgram).
## Batch upload cashgrams
Use the Batch Upload feature to create and send Cashgrams to multiple beneficiaries simultaneously. You must add all required details in a single file according to the required format and upload it in the Batch Upload section. Download the sample file to understand what information is required in the batch upload.
To upload a batch file:
1. Log in to the [Merchant Dashboard](https://merchant.cashfree.com/auth/login).
2. Go to **Payouts Dashboard** > **Cashgram** > **Batch** > click **Upload File**.
3. Click **Choose a File** to select the file you want to upload and then select **Upload**. The uploaded file will be visible in the **Batch** section.
4. Click on the file to view the individual Cashgram details uploaded in the file.
* Maximum file size allowed is 5 MB, and a maximum of 10,000 records can be
included in the file. - The file can't be uploaded if it's not according to the
suggested format. Also, if there are any errors in the uploaded file, you must
resolve all the errors and upload the file again.
You can view the status of the uploaded files and also download them to view more details.