> ## Documentation Index
> Fetch the complete documentation index at: https://www.cashfree.com/docs/llms.txt
> Use this file to discover all available pages before exploring further.
# Cashfree HERE
> Add Cashfree HERE to AI chat interfaces like ChatGPT and Claude so users can pay with UPI, QR codes, or cards directly inside the conversation safely.
Cashfree HERE is a payment plugin built on the Model Context Protocol (MCP) Apps standard. It renders interactive payment widgets directly inside AI chat interfaces, letting users pay with UPI (GPay, PhonePe, Paytm, BHIM), QR codes, or cards—all without exposing sensitive payment data to the AI model.
## Understanding Model Context Protocol Apps
An MCP (Model Context Protocol) App is an application that communicates with AI hosts (such as Claude Desktop, ChatGPT, and VS Code Copilot) through a standardised protocol. MCP defines how AI models discover and use **tools** (actions), **resources** (data and UI), and **prompts** (templates).
A standard MCP server exposes tools that return text. An MCP App extends this capability by serving **interactive UI widgets** as resources. When the AI invokes a tool, the host renders a rich widget inline within the chat, enabling experiences such as payment forms, booking interfaces, and dashboards.
### How Model Context Protocol Apps work
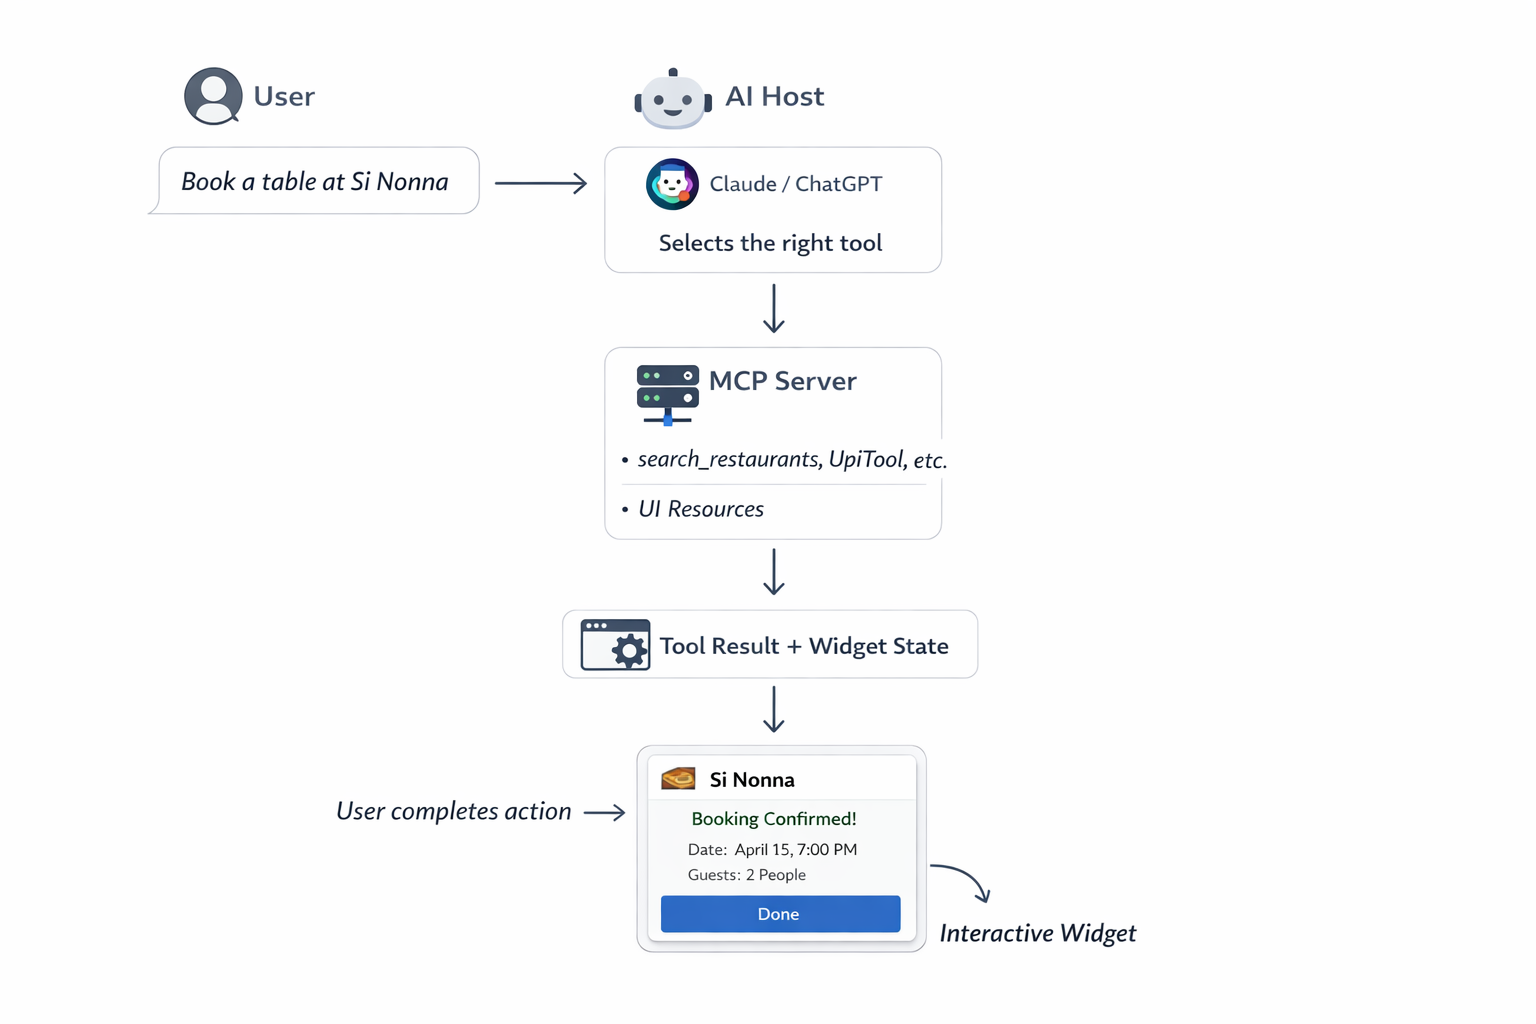 ### Key concepts
The core MCP concepts are defined in the following table:
| Concept | Description |
| -------------- | ---------------------------------------------------------------------------------------------------------------------- |
| **MCP server** | A service that exposes tools and resources over the MCP protocol (stdio or HTTP transport). |
| **Tool** | A function that the AI model can invoke. It takes structured input and returns structured output. |
| **Resource** | A piece of data or UI (HTML widget) that the host can render. Resources use URIs such as `ui://widget/booking.html`. |
| **Widget** | An HTML or React application served as a resource. It renders interactively inside the AI chat interface. |
| **Transport** | The method by which the AI host communicates with the MCP server: `stdio` (local) or `StreamableHTTP` (remote/hosted). |
Refer to the following resources for additional information about the MCP standard:
* [MCP Specification](https://modelcontextprotocol.io/) - The official Model Context Protocol documentation.
* [MCP Apps Extension](https://modelcontextprotocol.io/extensions/apps/overview#mcp-apps) - The MCP Apps extension specification for UI widgets and interactive resources.
* [MCP TypeScript SDK](https://github.com/modelcontextprotocol/typescript-sdk) - The official TypeScript SDK for building MCP servers and clients.
* [MCP ext-apps package](https://www.npmjs.com/package/@modelcontextprotocol/ext-apps) - Helpers for registering app resources and tools with UI metadata.
### Create your own Model Context Protocol App
To build an MCP App that renders UI widgets in AI chats, complete the following steps:
```typescript theme={"dark"}
import { McpServer } from "@modelcontextprotocol/sdk/server/mcp.js";
const server = new McpServer({ name: "my-app", version: "1.0.0" });
```
```typescript theme={"dark"}
server.registerResource(
"my-widget",
"ui://widget/app.html",
{ description: "My interactive widget", mimeType: "text/html;profile=mcp-app" },
async () => ({
contents: [{
uri: "ui://widget/app.html",
mimeType: "text/html;profile=mcp-app",
text: "...", // Your bundled React/HTML widget
}],
})
);
```
```typescript theme={"dark"}
server.registerTool("my_action", {
description: "Perform an action",
inputSchema: { query: z.string() },
_meta: {
"openai/outputTemplate": "ui://widget/app.html",
ui: { resourceUri: "ui://widget/app.html" },
},
}, async (args) => {
return {
content: [{ type: "text", text: "" }],
_meta: { /* data for your widget */ },
};
});
```
```typescript theme={"dark"}
import { StreamableHTTPServerTransport } from "@modelcontextprotocol/sdk/server/streamableHttp.js";
// Handle POST /mcp with StreamableHTTPServerTransport
```
Cashfree HERE handles all of this for the payment widget. You only need to register it on your server.
## Cashfree payment plugin
The `@cashfreepayments/cashfree-here` npm package provides pre-built payment tools and a payment widget. You register them on your MCP server, and the AI host renders the payment UI when the tool is invoked.
### Supported payment methods
The plugin supports the following payment methods:
| Method | Description |
| ---------------- | ---------------------------------------------------------------------------------------------------------- |
| **UPI Intent** | Launches GPay, PhonePe, Paytm, or BHIM directly on mobile. |
| **UPI QR Code** | Displays a scannable QR code for UPI payment. |
| **Cards** | Allows payment with credit or debit cards, including saved cards for one-tap checkout (PCI-DSS compliant). |
| **Net Banking** | Redirects the user to their bank's payment page. Supports 80+ Indian banks. |
| **ReservePay** | Coming soon. |
| **Cashfree Pay** | Coming soon. |
### Security
The payment widget implements the following security measures:
* Card details are handled entirely client-side within the widget.
* No sensitive payment data is sent to the AI model.
* Cashfree handles card processing (PCI-DSS compliant).
* 3D Secure is supported for card payments.
* Cards are stored and managed by using Cashfree's instrument vault.
### Prerequisites
Before you begin, ensure that you have the following prerequisites:
* Node.js version 18 or later.
* A [Cashfree Merchant Account](https://merchant.cashfree.com/merchants/signup).
* API credentials from the [Merchant Dashboard](https://merchant.cashfree.com/merchants/pg/developers/api-keys) (App ID and Secret Key). For more information, see [generate API keys](/api-reference/authentication#generate-api-keys).
### Installation
Install the package by using one of the following package managers:
```bash npm theme={"dark"}
npm install @cashfreepayments/cashfree-here
```
```bash yarn theme={"dark"}
yarn add @cashfreepayments/cashfree-here
```
```bash pnpm theme={"dark"}
pnpm add @cashfreepayments/cashfree-here
```
## Usage
The plugin exports three functions that you register on your MCP server. The following table describes each export:
| Export | Purpose |
| ------------------------- | ---------------------------------------------------- |
| `registerCashfreeWidget` | Registers the payment widget as an MCP resource. |
| `cashfreeUpiTool` | Registers the UPI payment tool (intent and QR code). |
| `cashfreeCardPaymentTool` | Registers the card payment tool. |
| `cashfreeNetbankingTool` | Registers the net banking payment tool. |
You can register them in two ways: by using the MCP ext-apps helpers or by using the standard MCP SDK directly. Both approaches work with any MCP Apps host, including ChatGPT and Claude.
Use `registerAppResource` and `registerAppTool` from `@modelcontextprotocol/ext-apps/server` for automatic MCP Apps metadata handling.
```typescript theme={"dark"}
import { McpServer } from "@modelcontextprotocol/sdk/server/mcp.js";
import {
registerAppResource,
registerAppTool,
} from "@modelcontextprotocol/ext-apps/server";
import {
registerCashfreeWidget,
cashfreeUpiTool,
cashfreeCardPaymentTool,
cashfreeNetbankingTool,
} from "@cashfreepayments/cashfree-here";
const server = new McpServer({
name: "My Payment Server",
version: "1.0.0",
});
// 1. Register the Payment Widget Resource
registerAppResource(
server,
...registerCashfreeWidget({ widgetBaseUrl: "https://your-server.com" })
);
// 2. Register Payment Tools
registerAppTool(server, ...cashfreeUpiTool({ environment: "production" }));
registerAppTool(
server,
...cashfreeCardPaymentTool({
environment: "production",
clientId: process.env.CASHFREE_CLIENT_ID!,
clientSecret: process.env.CASHFREE_CLIENT_SECRET!,
})
);
registerAppTool(server, ...cashfreeNetbankingTool({ environment: "production" }));
```
Use `server.registerResource` and `server.registerTool` directly. This works with the standard MCP SDK.
```typescript theme={"dark"}
import { McpServer } from "@modelcontextprotocol/sdk/server/mcp.js";
import {
registerCashfreeWidget,
cashfreeUpiTool,
cashfreeCardPaymentTool,
cashfreeNetbankingTool,
} from "@cashfreepayments/cashfree-here";
const SERVER_URL = "https://your-server.com";
const server = new McpServer({
name: "My Payment Server",
version: "1.0.0",
});
// 1. Register the Payment Widget Resource
server.registerResource(
...registerCashfreeWidget({ widgetBaseUrl: SERVER_URL })
);
// 2. Register Payment Tools
server.registerTool(...cashfreeUpiTool({ environment: "production" }));
server.registerTool(
...cashfreeCardPaymentTool({
environment: "production",
clientId: process.env.CASHFREE_CLIENT_ID!,
clientSecret: process.env.CASHFREE_CLIENT_SECRET!,
})
);
server.registerTool(...cashfreeNetbankingTool({ environment: "production" }));
```
### Configuration
The configuration interface for the Cashfree tools is defined as follows:
```typescript theme={"dark"}
interface CashfreeToolConfig {
environment: "sandbox" | "production";
clientId?: string; // Required only for card payments
clientSecret?: string; // Required only for card payments
}
```
The following table describes each configuration parameter:
| Parameter | Required | Description |
| -------------- | --------- | ---------------------------------------------------------------------- |
| `environment` | Yes | Specify `"sandbox"` for testing or `"production"` for live payments. |
| `clientId` | For cards | Your Cashfree App ID. Required only for `cashfreeCardPaymentTool`. |
| `clientSecret` | For cards | Your Cashfree Secret Key. Required only for `cashfreeCardPaymentTool`. |
`cashfreeNetbankingTool` only requires `environment`. No `clientId` or `clientSecret` is needed.
### Tool input schemas
The following sections define the input schemas for each tool:
**UpiTool**
```typescript theme={"dark"}
{
paymentSessionId: string; // Cashfree payment session ID (from order creation)
paymentApp?: "bhim" | "gpay" | "paytm" | "phonepe" | "qr"; // Optional preferred UPI method
}
```
**CardPaymentTool**
```typescript theme={"dark"}
{
paymentSessionId: string; // Cashfree payment session ID
customerId: string; // Customer ID to fetch saved cards for one-tap checkout
}
```
**NetbankingTool**
```typescript theme={"dark"}
{
paymentSessionId: string; // Cashfree payment session ID (from order creation)
bankCode?: number; // Optional Cashfree netbanking bank code
}
```
The `bankCode` parameter controls how the bank selection UI is presented:
| Scenario | Behaviour |
| ----------------------------- | ----------------------------------------------------------------------------------------------- |
| `bankCode` - **not provided** | The widget shows the full bank list (80+ banks). The user selects their bank before proceeding. |
| `bankCode` - **provided** | The widget skips the selection screen and opens the pay page for that specific bank only. |
Use the table below for common bank codes:
| Bank | Code |
| ------------------- | ---- |
| HDFC Bank | 3021 |
| ICICI Bank | 3022 |
| State Bank of India | 3044 |
| Axis Bank | 3003 |
| Kotak Mahindra Bank | 3032 |
For the complete list of supported bank codes, refer to the [Cashfree netbanking bank codes reference](/payments/manage/payment-methods/netbanking).
### Environment variables
Configure the following environment variables:
```bash theme={"dark"}
CASHFREE_CLIENT_ID=your_client_id
CASHFREE_CLIENT_SECRET=your_client_secret
```
## Example: Good Food restaurant booking app
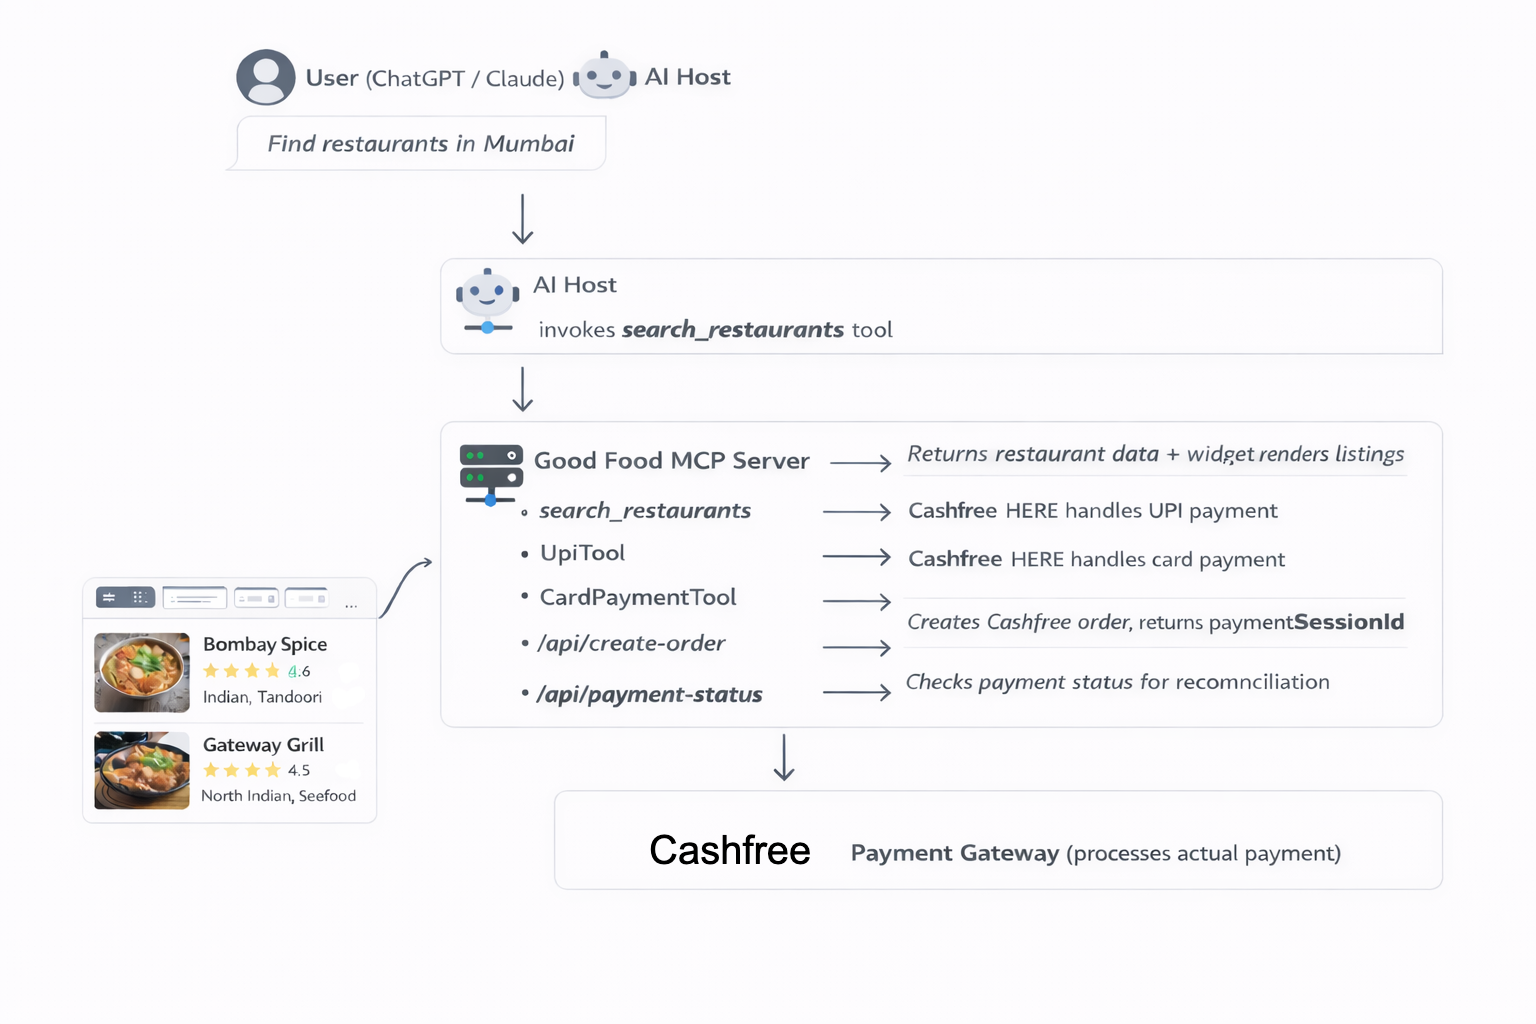
The **Good Food** app demonstrates a complete real-world integration: a restaurant table booking system with Cashfree HERE payments, running as an MCP App inside AI interfaces such as ChatGPT and Claude.
### What it does
The app follows this workflow:
1. The user asks to find restaurants in Mumbai.
2. The AI host invokes `search_restaurants`. The widget displays restaurant listings with images, ratings, and prices.
3. The user selects a restaurant and books a table.
4. The widget creates a Cashfree order and receives a `paymentSessionId`.
5. The AI host invokes `UpiTool` or `CardPaymentTool` with the session ID. The payment widget renders inline.
6. The user completes payment by using UPI or a card.
7. The booking is confirmed.
### How it integrates payment tools
The server registers Cashfree HERE alongside its own app-specific tools:
```typescript theme={"dark"}
import { McpServer } from "@modelcontextprotocol/sdk/server/mcp.js";
import {
cashfreeUpiTool,
cashfreeCardPaymentTool,
registerCashfreeWidget,
} from "@cashfreepayments/cashfree-here";
const SERVER_URL = process.env.SERVER_URL || "http://localhost:8787";
function createGoodFoodServer() {
const server = new McpServer({ name: "good-food", version: "1.0.0" });
// Register Cashfree HERE payment widget
server.registerResource(
...registerCashfreeWidget({ widgetBaseUrl: SERVER_URL })
);
// Register Cashfree HERE payment tools
server.registerTool(...cashfreeUpiTool({ environment: "production" }));
server.registerTool(
...cashfreeCardPaymentTool({
environment: "production",
clientId: process.env.CASHFREE_CLIENT_ID!,
clientSecret: process.env.CASHFREE_CLIENT_SECRET!,
})
);
// Register app-specific tools
server.registerTool("search_restaurants", {
title: "Search Restaurants",
description: "Search for restaurants by city",
inputSchema: { city: z.string().min(1) },
}, async (args) => {
const restaurants = await fetchRestaurants(args.city);
return {
content: [{ type: "text", text: "" }],
_meta: { restaurants, apiBaseUrl: SERVER_URL },
};
});
return server;
}
```
### Payment flow
The widget creates a Cashfree order by making a direct API call to the server, which returns a `paymentSessionId`. This session ID is then passed to the Cashfree HERE payment tools. The following example shows how to create a Cashfree order:
```typescript theme={"dark"}
// Server-side: API endpoint that the widget calls to create a Cashfree order
// POST /api/create-order
const response = await fetch("https://api.cashfree.com/pg/orders", {
method: "POST",
headers: {
"x-client-id": CASHFREE_CLIENT_ID,
"x-client-secret": CASHFREE_CLIENT_SECRET,
"Content-Type": "application/json",
"x-api-version": "2025-01-01",
},
body: JSON.stringify({
order_amount: totalAmount,
order_currency: "INR",
order_id: orderId,
customer_details: {
customer_id: "user_123",
customer_phone: "9876543210",
},
}),
});
const { payment_session_id } = await response.json();
// This paymentSessionId is passed to UpiTool or CardPaymentTool
```
### How the widget triggers payment tools
When a user selects a payment method inside the widget, the widget has two valid ways to continue the payment flow.
The important difference is simple:
1. **Call the tool now**
Use this when you want the payment tool to run immediately from the current widget.
2. **Create a new chat message**
Use this when you want the payment widget to appear in a separate ChatGPT message.
In practice, most confusion comes from mixing these two patterns. They are both correct, but they do different things.
#### Option 1: Call the payment tool immediately
Use this when the current widget should directly trigger the payment tool.
In ChatGPT, this is:
```typescript theme={"dark"}
await window.openai.callTool("UpiTool", {
paymentSessionId,
});
await window.openai.callTool("CardPaymentTool", {
paymentSessionId,
customerId: currentUser.id,
});
```
Use this option when:
* The user clicked a payment button inside the current widget.
* You want the host to run the payment tool immediately.
* You do not need to create a separate follow-up chat turn.
At the MCP Apps protocol level, this is the standard `tools or call` request. You only need the raw `postMessage` form if you are implementing the bridge yourself:
```typescript theme={"dark"}
// Inside the widget — user selected UPI payment
window.parent.postMessage(
{
jsonrpc: "2.0",
id: 1,
method: "tools/call",
params: {
name: "UpiTool",
arguments: { paymentSessionId },
},
},
"*"
);
```
#### Option 2: Ask the host to create a new chat message
Use this when you want the payment flow to continue in a **new message** in the chat, instead of staying inside the current widget.
This is a two-step pattern:
1. Send hidden technical instructions to the host.
2. Send a short user-facing message that creates the next chat turn.
With the MCP Apps bridge, that looks like this:
```typescript theme={"dark"}
import { App } from "@modelcontextprotocol/ext-apps";
const app = new App({ name: "My Widget", version: "1.0.0" });
await app.connect();
await app.updateModelContext({
content: [
{
type: "text",
text:
`The user tapped the UPI payment button. ` +
`Call only the UpiTool with ${JSON.stringify({ paymentSessionId })}. ` +
`Do not use any other tools and do not answer conversationally.`,
},
],
});
await app.sendMessage({
role: "user",
content: [{ type: "text", text: "Continue with UPI payment." }],
});
```
In ChatGPT, the convenience API for the follow-up message is:
```typescript theme={"dark"}
await window.openai.sendFollowUpMessage({
prompt:
`The user tapped the UPI payment button. ` +
`Call only the UpiTool with ${JSON.stringify({ paymentSessionId })}. ` +
`Do not use any other tools and do not answer conversationally.`,
});
```
Use this option when:
* you want the payment widget to open in a separate assistant/chat message
* you want the transcript to show a clear payment continuation step
* your app flow is designed around follow-up turns instead of in-place tool calls
#### Which option should you use?
* Use **`callTool` / `tools/call`** when the current widget should immediately launch the payment tool.
* Use **follow-up messaging** when you want the payment tool to appear in a **new chat message**.
#### Mapping to ChatGPT and MCP Apps
These are the current equivalents:
* `tools/call` -> `window.openai.callTool`
* `ui/message` -> `window.openai.sendFollowUpMessage`
* `ui/update-model-context` -> hidden model-visible context for the next turn
For new apps, build around the MCP Apps bridge first, and use `window.openai` when you want the ChatGPT convenience APIs. For more information, see [MCP Apps compatibility in ChatGPT](https://developers.openai.com/apps-sdk/mcp-apps-in-chatgpt#host-bridge) and the [Apps SDK reference](https://developers.openai.com/apps-sdk/reference#mcp-apps-ui-bridge).
**Providing the `customerId`**
The `CardPaymentTool` requires a `customerId` to fetch saved cards for one-tap checkout. This must be the ID of the currently logged-in user in your platform and not a hardcoded value. Pass it when creating the Cashfree order on your server so the widget receives it alongside the `paymentSessionId`.
```typescript theme={"dark"}
// Server-side: include the logged-in user's ID when creating the Cashfree order
body: JSON.stringify({
order_amount: totalAmount,
order_currency: "INR",
order_id: orderId,
customer_details: {
customer_id: currentUser.id, // The current logged-in user's ID from your platform
customer_phone: currentUser.phone,
},
})
```
### Architecture
### Key concepts
The core MCP concepts are defined in the following table:
| Concept | Description |
| -------------- | ---------------------------------------------------------------------------------------------------------------------- |
| **MCP server** | A service that exposes tools and resources over the MCP protocol (stdio or HTTP transport). |
| **Tool** | A function that the AI model can invoke. It takes structured input and returns structured output. |
| **Resource** | A piece of data or UI (HTML widget) that the host can render. Resources use URIs such as `ui://widget/booking.html`. |
| **Widget** | An HTML or React application served as a resource. It renders interactively inside the AI chat interface. |
| **Transport** | The method by which the AI host communicates with the MCP server: `stdio` (local) or `StreamableHTTP` (remote/hosted). |
Refer to the following resources for additional information about the MCP standard:
* [MCP Specification](https://modelcontextprotocol.io/) - The official Model Context Protocol documentation.
* [MCP Apps Extension](https://modelcontextprotocol.io/extensions/apps/overview#mcp-apps) - The MCP Apps extension specification for UI widgets and interactive resources.
* [MCP TypeScript SDK](https://github.com/modelcontextprotocol/typescript-sdk) - The official TypeScript SDK for building MCP servers and clients.
* [MCP ext-apps package](https://www.npmjs.com/package/@modelcontextprotocol/ext-apps) - Helpers for registering app resources and tools with UI metadata.
### Create your own Model Context Protocol App
To build an MCP App that renders UI widgets in AI chats, complete the following steps:
```typescript theme={"dark"}
import { McpServer } from "@modelcontextprotocol/sdk/server/mcp.js";
const server = new McpServer({ name: "my-app", version: "1.0.0" });
```
```typescript theme={"dark"}
server.registerResource(
"my-widget",
"ui://widget/app.html",
{ description: "My interactive widget", mimeType: "text/html;profile=mcp-app" },
async () => ({
contents: [{
uri: "ui://widget/app.html",
mimeType: "text/html;profile=mcp-app",
text: "...", // Your bundled React/HTML widget
}],
})
);
```
```typescript theme={"dark"}
server.registerTool("my_action", {
description: "Perform an action",
inputSchema: { query: z.string() },
_meta: {
"openai/outputTemplate": "ui://widget/app.html",
ui: { resourceUri: "ui://widget/app.html" },
},
}, async (args) => {
return {
content: [{ type: "text", text: "" }],
_meta: { /* data for your widget */ },
};
});
```
```typescript theme={"dark"}
import { StreamableHTTPServerTransport } from "@modelcontextprotocol/sdk/server/streamableHttp.js";
// Handle POST /mcp with StreamableHTTPServerTransport
```
Cashfree HERE handles all of this for the payment widget. You only need to register it on your server.
## Cashfree payment plugin
The `@cashfreepayments/cashfree-here` npm package provides pre-built payment tools and a payment widget. You register them on your MCP server, and the AI host renders the payment UI when the tool is invoked.
### Supported payment methods
The plugin supports the following payment methods:
| Method | Description |
| ---------------- | ---------------------------------------------------------------------------------------------------------- |
| **UPI Intent** | Launches GPay, PhonePe, Paytm, or BHIM directly on mobile. |
| **UPI QR Code** | Displays a scannable QR code for UPI payment. |
| **Cards** | Allows payment with credit or debit cards, including saved cards for one-tap checkout (PCI-DSS compliant). |
| **Net Banking** | Redirects the user to their bank's payment page. Supports 80+ Indian banks. |
| **ReservePay** | Coming soon. |
| **Cashfree Pay** | Coming soon. |
### Security
The payment widget implements the following security measures:
* Card details are handled entirely client-side within the widget.
* No sensitive payment data is sent to the AI model.
* Cashfree handles card processing (PCI-DSS compliant).
* 3D Secure is supported for card payments.
* Cards are stored and managed by using Cashfree's instrument vault.
### Prerequisites
Before you begin, ensure that you have the following prerequisites:
* Node.js version 18 or later.
* A [Cashfree Merchant Account](https://merchant.cashfree.com/merchants/signup).
* API credentials from the [Merchant Dashboard](https://merchant.cashfree.com/merchants/pg/developers/api-keys) (App ID and Secret Key). For more information, see [generate API keys](/api-reference/authentication#generate-api-keys).
### Installation
Install the package by using one of the following package managers:
```bash npm theme={"dark"}
npm install @cashfreepayments/cashfree-here
```
```bash yarn theme={"dark"}
yarn add @cashfreepayments/cashfree-here
```
```bash pnpm theme={"dark"}
pnpm add @cashfreepayments/cashfree-here
```
## Usage
The plugin exports three functions that you register on your MCP server. The following table describes each export:
| Export | Purpose |
| ------------------------- | ---------------------------------------------------- |
| `registerCashfreeWidget` | Registers the payment widget as an MCP resource. |
| `cashfreeUpiTool` | Registers the UPI payment tool (intent and QR code). |
| `cashfreeCardPaymentTool` | Registers the card payment tool. |
| `cashfreeNetbankingTool` | Registers the net banking payment tool. |
You can register them in two ways: by using the MCP ext-apps helpers or by using the standard MCP SDK directly. Both approaches work with any MCP Apps host, including ChatGPT and Claude.
Use `registerAppResource` and `registerAppTool` from `@modelcontextprotocol/ext-apps/server` for automatic MCP Apps metadata handling.
```typescript theme={"dark"}
import { McpServer } from "@modelcontextprotocol/sdk/server/mcp.js";
import {
registerAppResource,
registerAppTool,
} from "@modelcontextprotocol/ext-apps/server";
import {
registerCashfreeWidget,
cashfreeUpiTool,
cashfreeCardPaymentTool,
cashfreeNetbankingTool,
} from "@cashfreepayments/cashfree-here";
const server = new McpServer({
name: "My Payment Server",
version: "1.0.0",
});
// 1. Register the Payment Widget Resource
registerAppResource(
server,
...registerCashfreeWidget({ widgetBaseUrl: "https://your-server.com" })
);
// 2. Register Payment Tools
registerAppTool(server, ...cashfreeUpiTool({ environment: "production" }));
registerAppTool(
server,
...cashfreeCardPaymentTool({
environment: "production",
clientId: process.env.CASHFREE_CLIENT_ID!,
clientSecret: process.env.CASHFREE_CLIENT_SECRET!,
})
);
registerAppTool(server, ...cashfreeNetbankingTool({ environment: "production" }));
```
Use `server.registerResource` and `server.registerTool` directly. This works with the standard MCP SDK.
```typescript theme={"dark"}
import { McpServer } from "@modelcontextprotocol/sdk/server/mcp.js";
import {
registerCashfreeWidget,
cashfreeUpiTool,
cashfreeCardPaymentTool,
cashfreeNetbankingTool,
} from "@cashfreepayments/cashfree-here";
const SERVER_URL = "https://your-server.com";
const server = new McpServer({
name: "My Payment Server",
version: "1.0.0",
});
// 1. Register the Payment Widget Resource
server.registerResource(
...registerCashfreeWidget({ widgetBaseUrl: SERVER_URL })
);
// 2. Register Payment Tools
server.registerTool(...cashfreeUpiTool({ environment: "production" }));
server.registerTool(
...cashfreeCardPaymentTool({
environment: "production",
clientId: process.env.CASHFREE_CLIENT_ID!,
clientSecret: process.env.CASHFREE_CLIENT_SECRET!,
})
);
server.registerTool(...cashfreeNetbankingTool({ environment: "production" }));
```
### Configuration
The configuration interface for the Cashfree tools is defined as follows:
```typescript theme={"dark"}
interface CashfreeToolConfig {
environment: "sandbox" | "production";
clientId?: string; // Required only for card payments
clientSecret?: string; // Required only for card payments
}
```
The following table describes each configuration parameter:
| Parameter | Required | Description |
| -------------- | --------- | ---------------------------------------------------------------------- |
| `environment` | Yes | Specify `"sandbox"` for testing or `"production"` for live payments. |
| `clientId` | For cards | Your Cashfree App ID. Required only for `cashfreeCardPaymentTool`. |
| `clientSecret` | For cards | Your Cashfree Secret Key. Required only for `cashfreeCardPaymentTool`. |
`cashfreeNetbankingTool` only requires `environment`. No `clientId` or `clientSecret` is needed.
### Tool input schemas
The following sections define the input schemas for each tool:
**UpiTool**
```typescript theme={"dark"}
{
paymentSessionId: string; // Cashfree payment session ID (from order creation)
paymentApp?: "bhim" | "gpay" | "paytm" | "phonepe" | "qr"; // Optional preferred UPI method
}
```
**CardPaymentTool**
```typescript theme={"dark"}
{
paymentSessionId: string; // Cashfree payment session ID
customerId: string; // Customer ID to fetch saved cards for one-tap checkout
}
```
**NetbankingTool**
```typescript theme={"dark"}
{
paymentSessionId: string; // Cashfree payment session ID (from order creation)
bankCode?: number; // Optional Cashfree netbanking bank code
}
```
The `bankCode` parameter controls how the bank selection UI is presented:
| Scenario | Behaviour |
| ----------------------------- | ----------------------------------------------------------------------------------------------- |
| `bankCode` - **not provided** | The widget shows the full bank list (80+ banks). The user selects their bank before proceeding. |
| `bankCode` - **provided** | The widget skips the selection screen and opens the pay page for that specific bank only. |
Use the table below for common bank codes:
| Bank | Code |
| ------------------- | ---- |
| HDFC Bank | 3021 |
| ICICI Bank | 3022 |
| State Bank of India | 3044 |
| Axis Bank | 3003 |
| Kotak Mahindra Bank | 3032 |
For the complete list of supported bank codes, refer to the [Cashfree netbanking bank codes reference](/payments/manage/payment-methods/netbanking).
### Environment variables
Configure the following environment variables:
```bash theme={"dark"}
CASHFREE_CLIENT_ID=your_client_id
CASHFREE_CLIENT_SECRET=your_client_secret
```
## Example: Good Food restaurant booking app
The **Good Food** app demonstrates a complete real-world integration: a restaurant table booking system with Cashfree HERE payments, running as an MCP App inside AI interfaces such as ChatGPT and Claude.
### What it does
The app follows this workflow:
1. The user asks to find restaurants in Mumbai.
2. The AI host invokes `search_restaurants`. The widget displays restaurant listings with images, ratings, and prices.
3. The user selects a restaurant and books a table.
4. The widget creates a Cashfree order and receives a `paymentSessionId`.
5. The AI host invokes `UpiTool` or `CardPaymentTool` with the session ID. The payment widget renders inline.
6. The user completes payment by using UPI or a card.
7. The booking is confirmed.
### How it integrates payment tools
The server registers Cashfree HERE alongside its own app-specific tools:
```typescript theme={"dark"}
import { McpServer } from "@modelcontextprotocol/sdk/server/mcp.js";
import {
cashfreeUpiTool,
cashfreeCardPaymentTool,
registerCashfreeWidget,
} from "@cashfreepayments/cashfree-here";
const SERVER_URL = process.env.SERVER_URL || "http://localhost:8787";
function createGoodFoodServer() {
const server = new McpServer({ name: "good-food", version: "1.0.0" });
// Register Cashfree HERE payment widget
server.registerResource(
...registerCashfreeWidget({ widgetBaseUrl: SERVER_URL })
);
// Register Cashfree HERE payment tools
server.registerTool(...cashfreeUpiTool({ environment: "production" }));
server.registerTool(
...cashfreeCardPaymentTool({
environment: "production",
clientId: process.env.CASHFREE_CLIENT_ID!,
clientSecret: process.env.CASHFREE_CLIENT_SECRET!,
})
);
// Register app-specific tools
server.registerTool("search_restaurants", {
title: "Search Restaurants",
description: "Search for restaurants by city",
inputSchema: { city: z.string().min(1) },
}, async (args) => {
const restaurants = await fetchRestaurants(args.city);
return {
content: [{ type: "text", text: "" }],
_meta: { restaurants, apiBaseUrl: SERVER_URL },
};
});
return server;
}
```
### Payment flow
The widget creates a Cashfree order by making a direct API call to the server, which returns a `paymentSessionId`. This session ID is then passed to the Cashfree HERE payment tools. The following example shows how to create a Cashfree order:
```typescript theme={"dark"}
// Server-side: API endpoint that the widget calls to create a Cashfree order
// POST /api/create-order
const response = await fetch("https://api.cashfree.com/pg/orders", {
method: "POST",
headers: {
"x-client-id": CASHFREE_CLIENT_ID,
"x-client-secret": CASHFREE_CLIENT_SECRET,
"Content-Type": "application/json",
"x-api-version": "2025-01-01",
},
body: JSON.stringify({
order_amount: totalAmount,
order_currency: "INR",
order_id: orderId,
customer_details: {
customer_id: "user_123",
customer_phone: "9876543210",
},
}),
});
const { payment_session_id } = await response.json();
// This paymentSessionId is passed to UpiTool or CardPaymentTool
```
### How the widget triggers payment tools
When a user selects a payment method inside the widget, the widget has two valid ways to continue the payment flow.
The important difference is simple:
1. **Call the tool now**
Use this when you want the payment tool to run immediately from the current widget.
2. **Create a new chat message**
Use this when you want the payment widget to appear in a separate ChatGPT message.
In practice, most confusion comes from mixing these two patterns. They are both correct, but they do different things.
#### Option 1: Call the payment tool immediately
Use this when the current widget should directly trigger the payment tool.
In ChatGPT, this is:
```typescript theme={"dark"}
await window.openai.callTool("UpiTool", {
paymentSessionId,
});
await window.openai.callTool("CardPaymentTool", {
paymentSessionId,
customerId: currentUser.id,
});
```
Use this option when:
* The user clicked a payment button inside the current widget.
* You want the host to run the payment tool immediately.
* You do not need to create a separate follow-up chat turn.
At the MCP Apps protocol level, this is the standard `tools or call` request. You only need the raw `postMessage` form if you are implementing the bridge yourself:
```typescript theme={"dark"}
// Inside the widget — user selected UPI payment
window.parent.postMessage(
{
jsonrpc: "2.0",
id: 1,
method: "tools/call",
params: {
name: "UpiTool",
arguments: { paymentSessionId },
},
},
"*"
);
```
#### Option 2: Ask the host to create a new chat message
Use this when you want the payment flow to continue in a **new message** in the chat, instead of staying inside the current widget.
This is a two-step pattern:
1. Send hidden technical instructions to the host.
2. Send a short user-facing message that creates the next chat turn.
With the MCP Apps bridge, that looks like this:
```typescript theme={"dark"}
import { App } from "@modelcontextprotocol/ext-apps";
const app = new App({ name: "My Widget", version: "1.0.0" });
await app.connect();
await app.updateModelContext({
content: [
{
type: "text",
text:
`The user tapped the UPI payment button. ` +
`Call only the UpiTool with ${JSON.stringify({ paymentSessionId })}. ` +
`Do not use any other tools and do not answer conversationally.`,
},
],
});
await app.sendMessage({
role: "user",
content: [{ type: "text", text: "Continue with UPI payment." }],
});
```
In ChatGPT, the convenience API for the follow-up message is:
```typescript theme={"dark"}
await window.openai.sendFollowUpMessage({
prompt:
`The user tapped the UPI payment button. ` +
`Call only the UpiTool with ${JSON.stringify({ paymentSessionId })}. ` +
`Do not use any other tools and do not answer conversationally.`,
});
```
Use this option when:
* you want the payment widget to open in a separate assistant/chat message
* you want the transcript to show a clear payment continuation step
* your app flow is designed around follow-up turns instead of in-place tool calls
#### Which option should you use?
* Use **`callTool` / `tools/call`** when the current widget should immediately launch the payment tool.
* Use **follow-up messaging** when you want the payment tool to appear in a **new chat message**.
#### Mapping to ChatGPT and MCP Apps
These are the current equivalents:
* `tools/call` -> `window.openai.callTool`
* `ui/message` -> `window.openai.sendFollowUpMessage`
* `ui/update-model-context` -> hidden model-visible context for the next turn
For new apps, build around the MCP Apps bridge first, and use `window.openai` when you want the ChatGPT convenience APIs. For more information, see [MCP Apps compatibility in ChatGPT](https://developers.openai.com/apps-sdk/mcp-apps-in-chatgpt#host-bridge) and the [Apps SDK reference](https://developers.openai.com/apps-sdk/reference#mcp-apps-ui-bridge).
**Providing the `customerId`**
The `CardPaymentTool` requires a `customerId` to fetch saved cards for one-tap checkout. This must be the ID of the currently logged-in user in your platform and not a hardcoded value. Pass it when creating the Cashfree order on your server so the widget receives it alongside the `paymentSessionId`.
```typescript theme={"dark"}
// Server-side: include the logged-in user's ID when creating the Cashfree order
body: JSON.stringify({
order_amount: totalAmount,
order_currency: "INR",
order_id: orderId,
customer_details: {
customer_id: currentUser.id, // The current logged-in user's ID from your platform
customer_phone: currentUser.phone,
},
})
```
### Architecture
 ## Building a custom payment host
If you are building your own AI-powered product (such as your own chat interface, assistant, or custom platform), you aren't limited to ChatGPT or Claude. You can build a custom host that connects to your MCP server and renders the Cashfree HERE payment widget directly in your interface.
To support Cashfree HERE (and MCP Apps in general) in your own host, your platform must complete the following tasks:
Connect to the MCP server by using HTTP and `StreamableHTTPServerTransport`. Discover its tools and resources.
Detect UI resources. When a tool result references a resource with `mimeType: "text/html;profile=mcp-app"`, treat it as a widget.
Render the widget in a sandboxed iframe. Pass tool arguments and results into the iframe by using `postMessage`, following the MCP Apps messaging protocol.
Proxy tool calls from the widget. The widget may invoke further MCP tools (such as `UpiTool`) from within the iframe. Your host must relay these calls back to the MCP server.
The MCP Apps extension defines the full host-side protocol. This includes how the iframe is initialised, how tool data is delivered, and how bidirectional messaging works.
### Reference host implementation
The MCP Apps team provides a [`basic-host` reference implementation](https://github.com/modelcontextprotocol/ext-apps/tree/main/examples/basic-host) in the official `ext-apps` repository. It is a minimal working example of an MCP Apps host. It connects to any MCP server, calls tools, and renders widget UIs in sandboxed iframes. Use it as a starting point for your own platform.
### Using `@mcp-ui/client`
If your platform is React-based, the [`@mcp-ui/client`](https://mcpui.dev/guide/introduction) package provides ready-made React components for rendering MCP Apps views. It handles the iframe sandboxing, `postMessage` protocol, and tool result delivery. You don't have to implement the host protocol from scratch.
To install the package, run the following command:
```bash theme={"dark"}
npm install @mcp-ui/client
```
MCP Apps widgets run in a sandboxed iframe. They can't access your parent page, cookies, or DOM. This security model makes it safe to embed third-party MCP App widgets, including Cashfree HERE, in your own product.
***
## Resources
Install the Cashfree HERE plugin from npm.
Official MCP Apps extension spec for UI widgets and interactive resources.
Basic-host reference implementation and examples for building MCP Apps hosts.
React components for rendering MCP Apps widgets in your own host application.
## Building a custom payment host
If you are building your own AI-powered product (such as your own chat interface, assistant, or custom platform), you aren't limited to ChatGPT or Claude. You can build a custom host that connects to your MCP server and renders the Cashfree HERE payment widget directly in your interface.
To support Cashfree HERE (and MCP Apps in general) in your own host, your platform must complete the following tasks:
Connect to the MCP server by using HTTP and `StreamableHTTPServerTransport`. Discover its tools and resources.
Detect UI resources. When a tool result references a resource with `mimeType: "text/html;profile=mcp-app"`, treat it as a widget.
Render the widget in a sandboxed iframe. Pass tool arguments and results into the iframe by using `postMessage`, following the MCP Apps messaging protocol.
Proxy tool calls from the widget. The widget may invoke further MCP tools (such as `UpiTool`) from within the iframe. Your host must relay these calls back to the MCP server.
The MCP Apps extension defines the full host-side protocol. This includes how the iframe is initialised, how tool data is delivered, and how bidirectional messaging works.
### Reference host implementation
The MCP Apps team provides a [`basic-host` reference implementation](https://github.com/modelcontextprotocol/ext-apps/tree/main/examples/basic-host) in the official `ext-apps` repository. It is a minimal working example of an MCP Apps host. It connects to any MCP server, calls tools, and renders widget UIs in sandboxed iframes. Use it as a starting point for your own platform.
### Using `@mcp-ui/client`
If your platform is React-based, the [`@mcp-ui/client`](https://mcpui.dev/guide/introduction) package provides ready-made React components for rendering MCP Apps views. It handles the iframe sandboxing, `postMessage` protocol, and tool result delivery. You don't have to implement the host protocol from scratch.
To install the package, run the following command:
```bash theme={"dark"}
npm install @mcp-ui/client
```
MCP Apps widgets run in a sandboxed iframe. They can't access your parent page, cookies, or DOM. This security model makes it safe to embed third-party MCP App widgets, including Cashfree HERE, in your own product.
***
## Resources
Install the Cashfree HERE plugin from npm.
Official MCP Apps extension spec for UI widgets and interactive resources.
Basic-host reference implementation and examples for building MCP Apps hosts.
React components for rendering MCP Apps widgets in your own host application.