Supported platforms
Cashfree supports integration with the following analytics platforms:- Google Analytics 4 (GA4)
- Meta Pixel
- Mixpanel
- Google Ads (via GA4 linking)
- Meta Ads (via Meta Pixel linking)
If your analytics provider is not listed, contact Cashfree support.
Configure external analytics
To configure external analytics integration, follow these steps:- Log in to the Merchant Dashboard.
- In the Payment Gateway section, select Access.
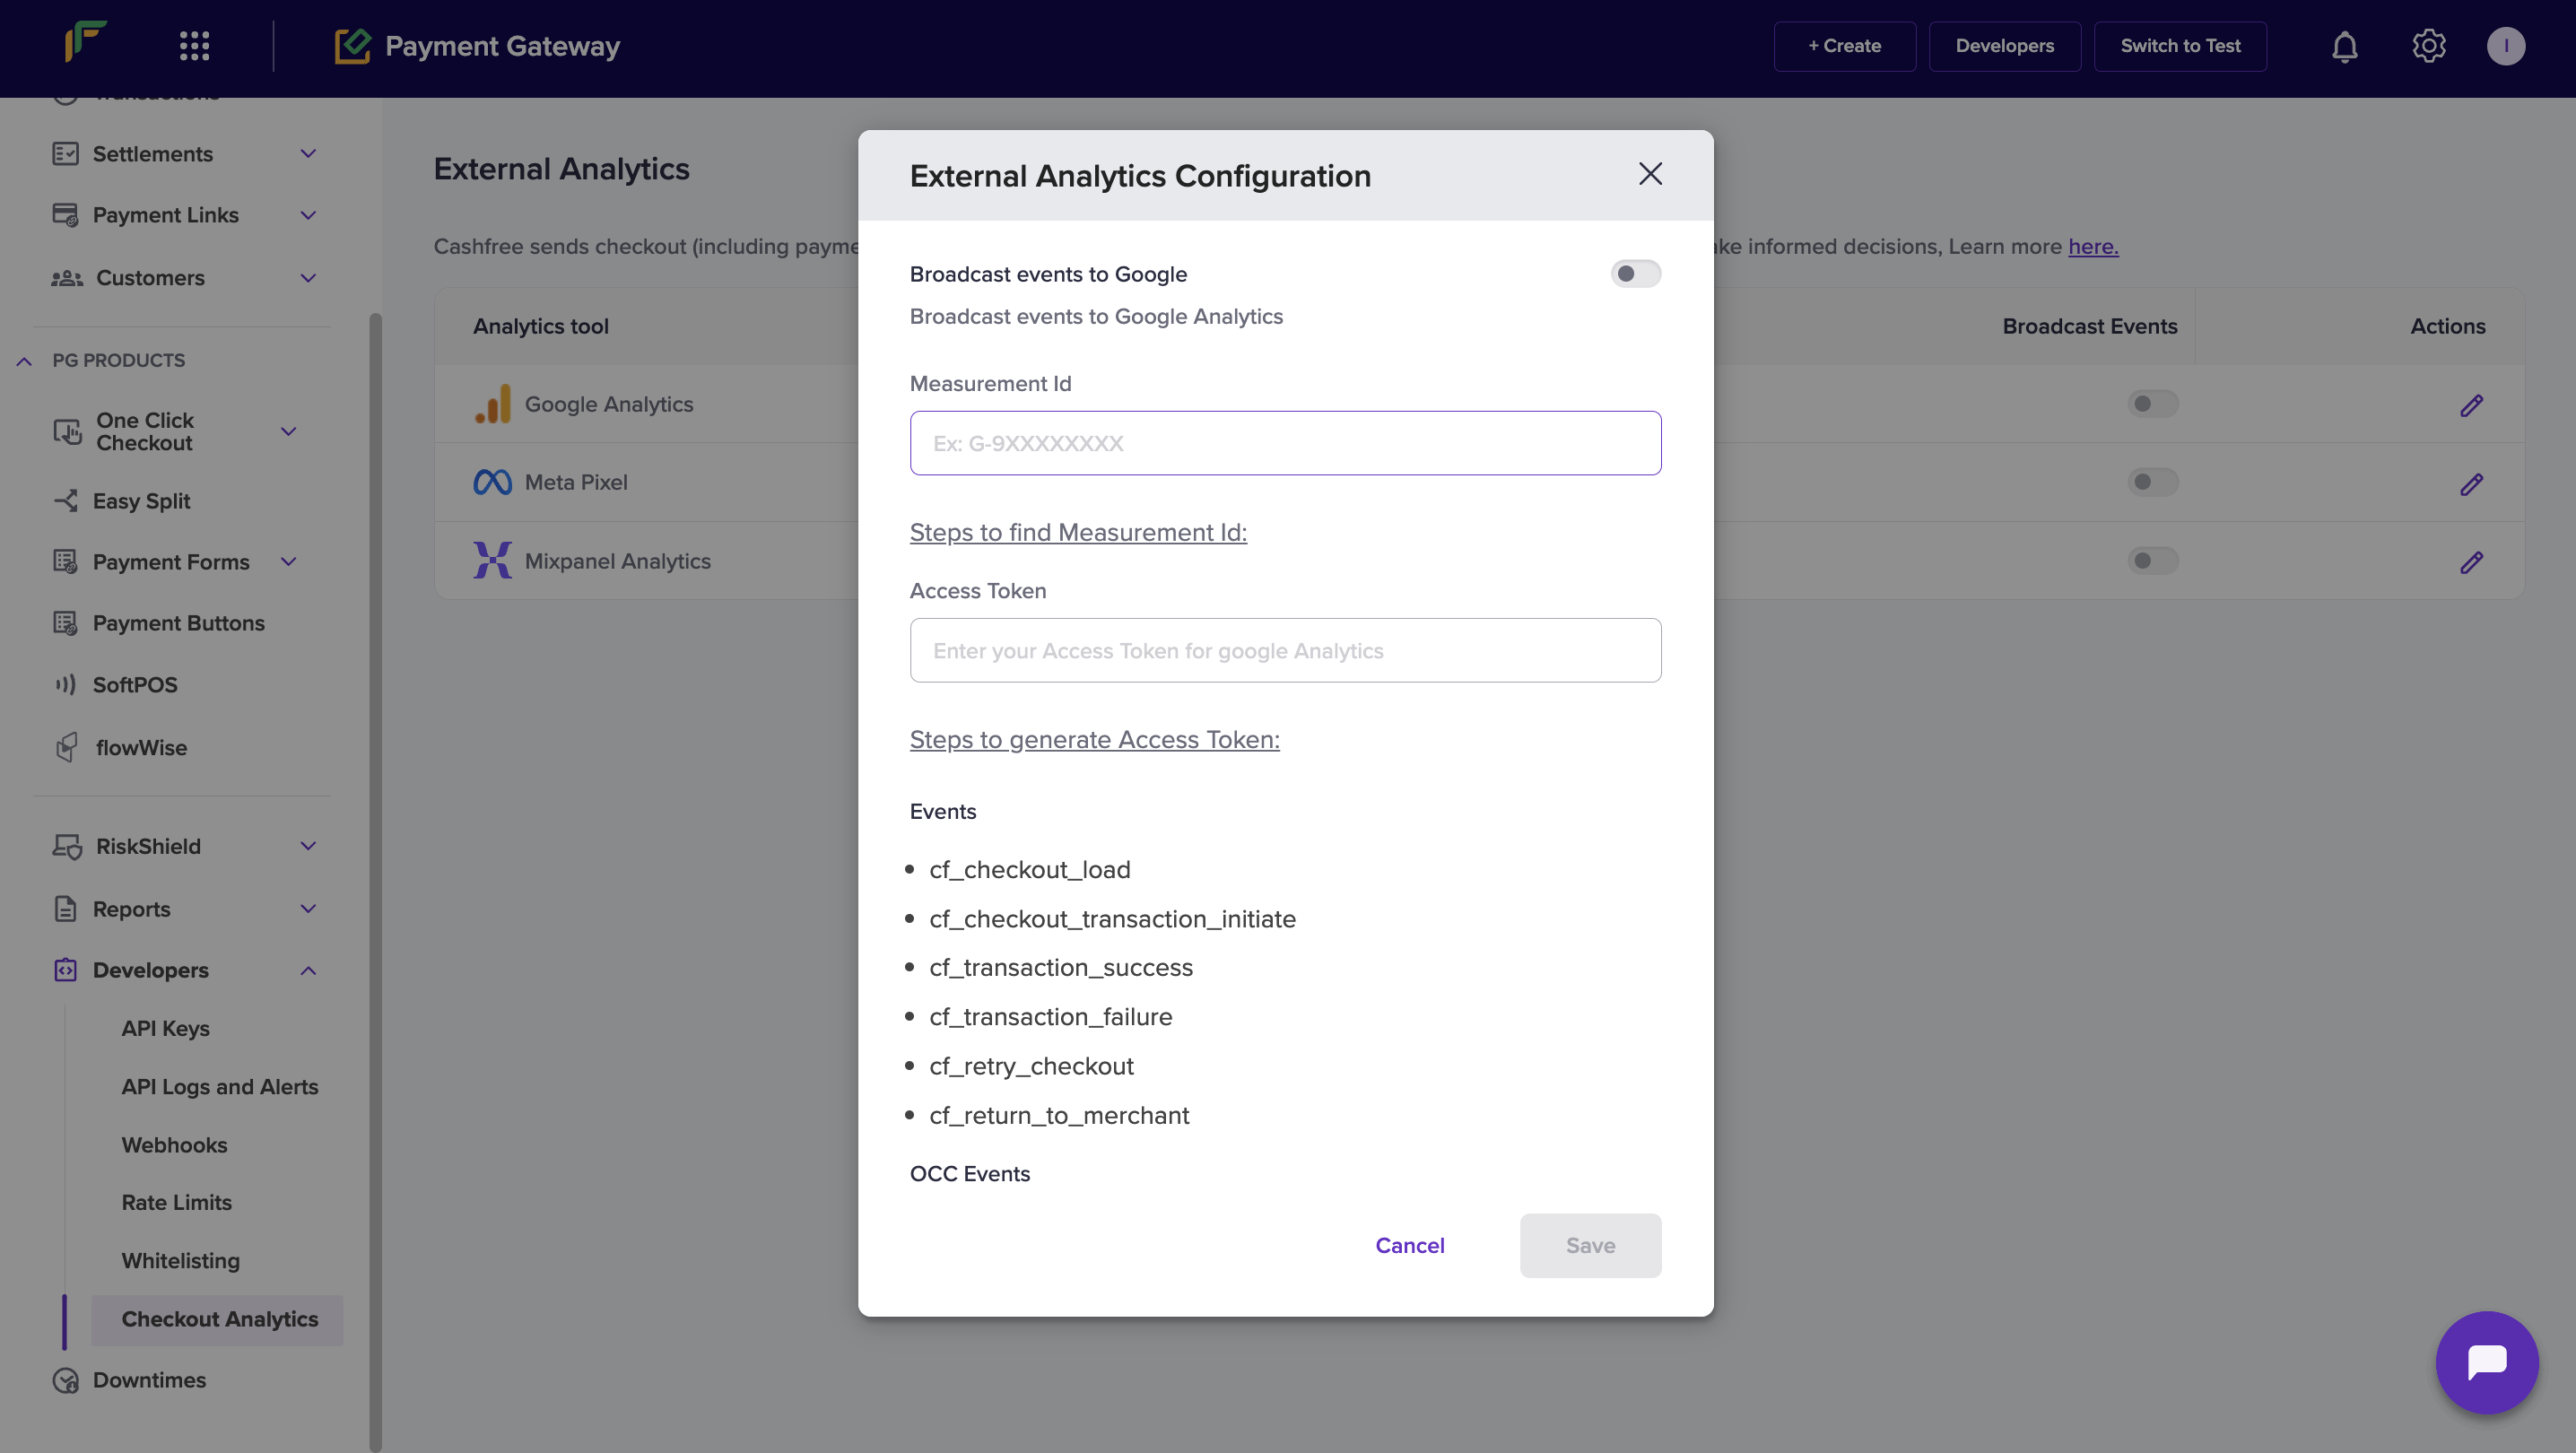
- In the left navigation pane, select Developers > Checkout Analytics.
- Under the Actions column, select the Edit icon.
- In the External Analytics Configuration modal, configure the integration as described in the setup sections below.
- Select Save to apply your changes.
Event categories
Events are organised into different categories based on where they are triggered and what they track. You can track customer interactions in your integration by using the following event categories:- Checkout
- One Click Checkout (OCC)
Checkout events
Use these events to track customer interactions in the standard checkout flow, including checkout pages, payment links, and payment forms.Client-side checkout events
Client-side events are triggered in the browser or app when customers interact with the checkout interface.| Event name | Description |
|---|---|
cf_checkout_load | Checkout loaded successfully. |
cf_checkout_transaction_initiate | Customer initiated a transaction. |
cf_transaction_success | Transaction completed successfully. |
cf_transaction_failure | Transaction failed. |
cf_retry_checkout | Redirected to checkout after failure. |
cf_return_to_merchant | Customer redirected back to merchant page. |
Client-side payment link and payment form events
| Event name | Description |
|---|---|
cf_pl_load | Payment link loaded successfully. |
cf_pf_load | Payment form loaded successfully. |
cf_checkout_initiated | Checkout initiated from a payment link or form. |
cf_purchase_completed | Payment completed successfully. |
One click checkout (OCC) events
Use these events to track customer interactions in the One Click Checkout (OCC) flow. OCC events are available for server-side and client-side tracking.Server-side events
Server-side events are pushed to Google Analytics 4 (GA4) and Meta Facebook.| GA4 event | Meta Facebook event |
|---|---|
begin_checkout (standard event) | InitiateCheckout (standard event) |
cf_checkout_login_otp_sent | cf_checkout_login_otp_sent |
cf_checkout_login_verify | cf_checkout_login_verify |
add_shipping_info (standard) | cf_checkout_address_collected |
cf_checkout_payment_info_displayed | cf_checkout_payment_info_displayed |
add_payment_info (standard) | AddPaymentInfo (standard event) |
purchase (standard) | purchase (standard event) |
Client-side events
Client-side events are triggered in the browser or app when customers interact with OCC pages.| Event name | Description |
|---|---|
cf_checkout_occ_load | First page or login page loaded. |
cf_checkout_login_verify | OTP verified. |
cf_checkout_login_otp_sent | OTP sent. |
cf_checkout_address_load | Addresses loaded. |
cf_checkout_address_collected | Address save or continue clicked. |
cf_checkout_load | Payment page opened. |
cf_checkout_transaction_initiate | Order payment transaction initiated. |
cf_checkout_offer_apply | Offer applied. |
cf_checkout_offer_remove | Offer removed. |
cf_checkout_order_cancelled | Order cancelled. |
cf_checkout_address_deleted | Address deleted. |
cf_checkout_address_updated | Address updated. |
transaction_success | Triggered only for non-Shopify integrations. |
Setup instructions
Follow the platform-specific instructions below to configure your analytics integration.Google Analytics 4 (GA4)
Google Analytics 4 (GA4)
To set up GA4 integration, complete the following steps:
- Sign in to your GA4 account.
- Go to Admin (bottom left).
- Select Data Streams and open the relevant stream.
- Copy the Measurement ID.
- In Cashfree’s External Analytics Configuration modal, enable Broadcast events to Google.
- Enter the Measurement ID.
- Generate an API token:
- In GA4 Admin, select Measurement Protocol API secrets.
- Create a new API secret and copy the value.
- Enter the Access Token in Cashfree’s configuration modal.
- Select Save.
- In GA4, go to Reports > Realtime Overview.
- Perform a test transaction.
- Events should appear in real time.
Meta Pixel
Meta Pixel
To set up Meta Pixel integration, complete the following steps: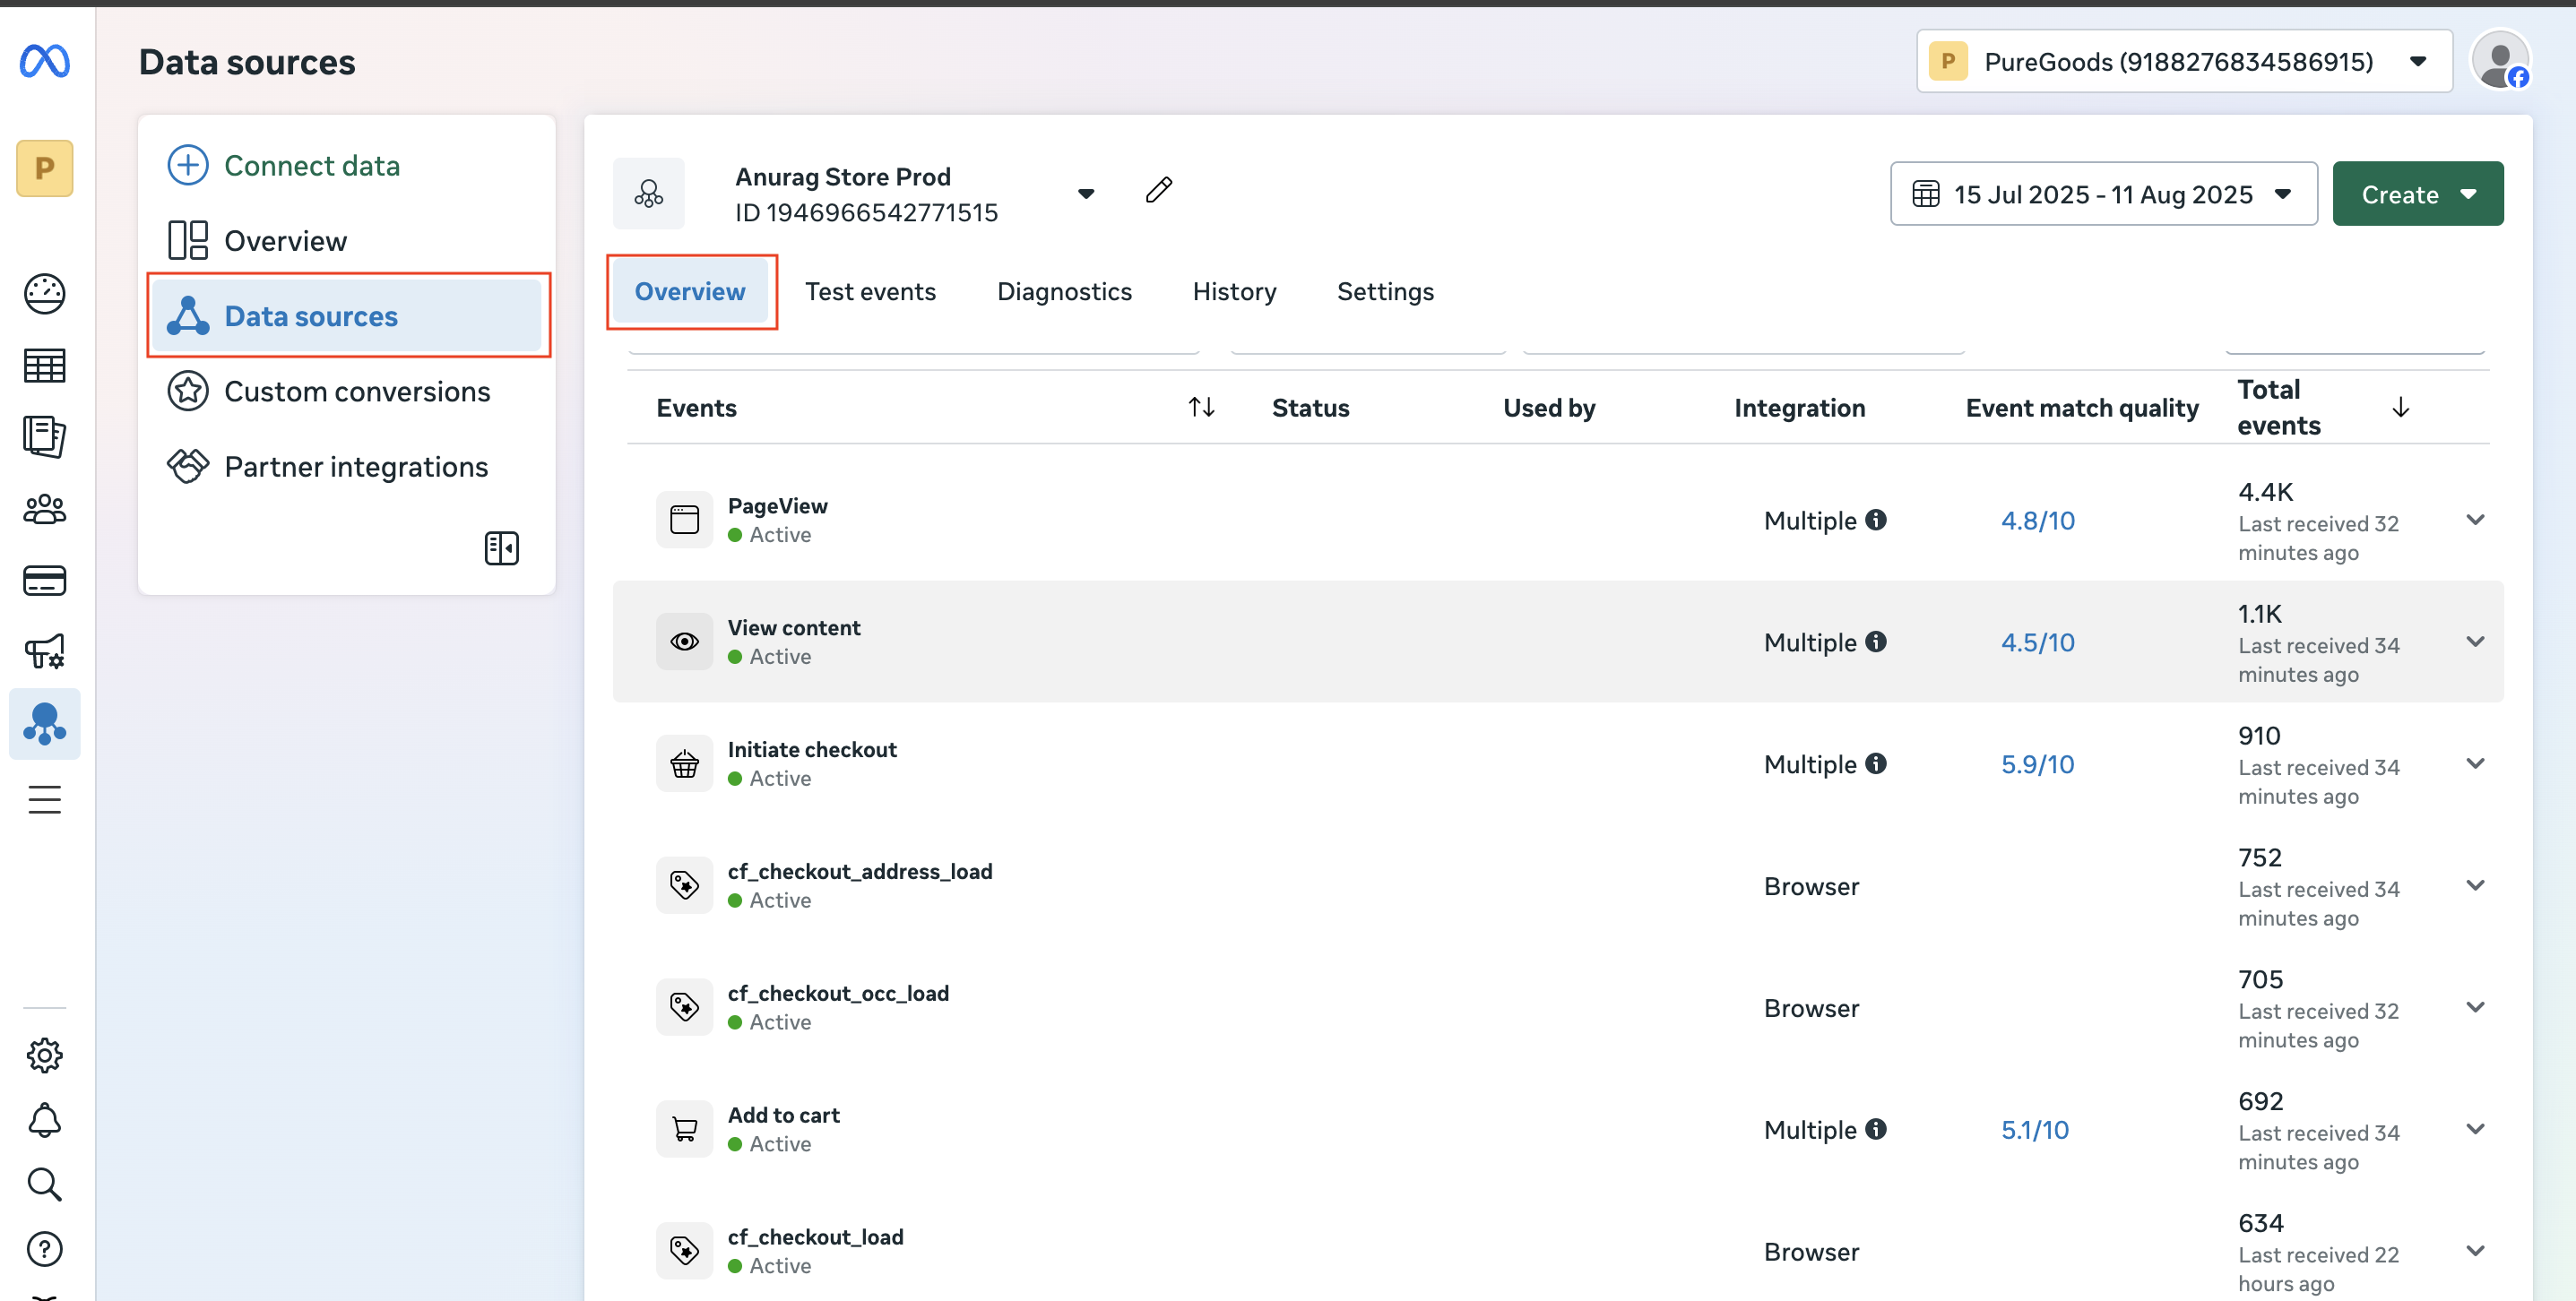
- Sign in to Meta Events Manager.
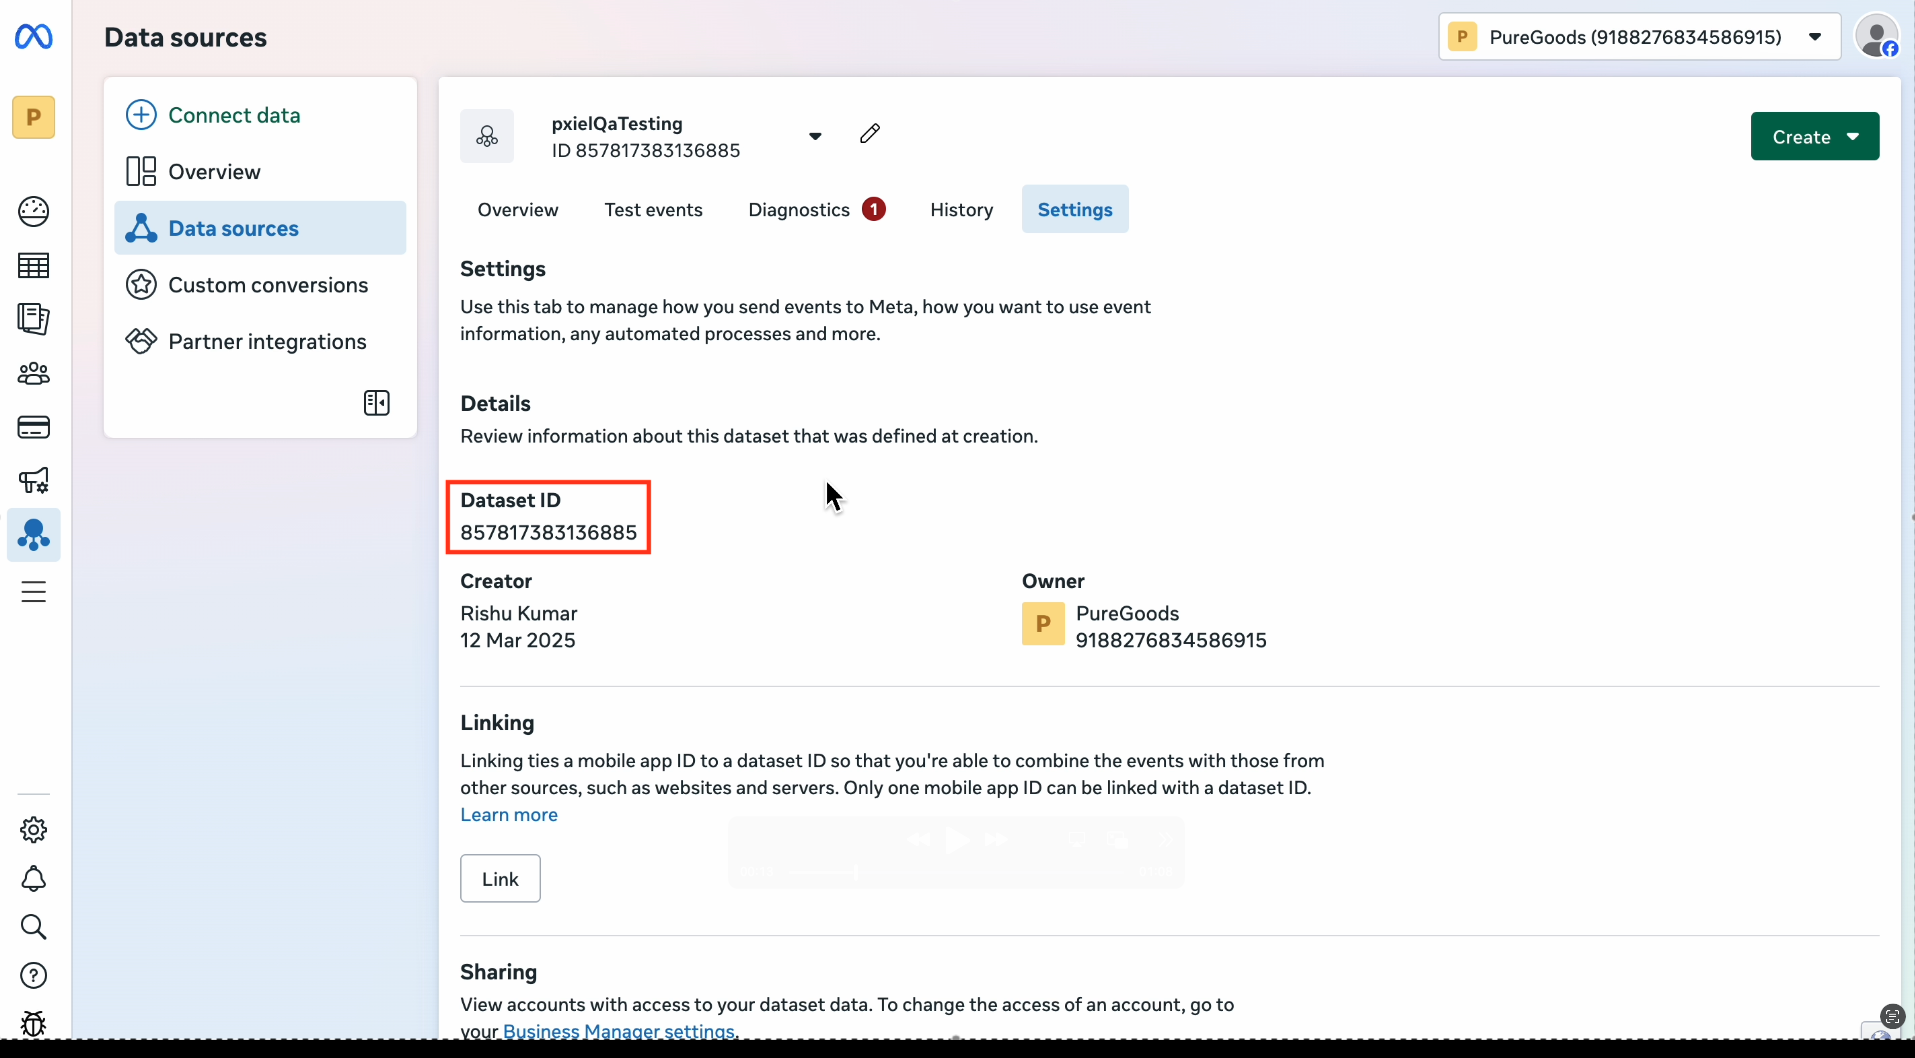
- Select your Pixel from Data Sources.
- Copy the Pixel ID from Settings.
- Generate an Access Token:
- Scroll to Conversions API.
- Select Generate Access Token.\
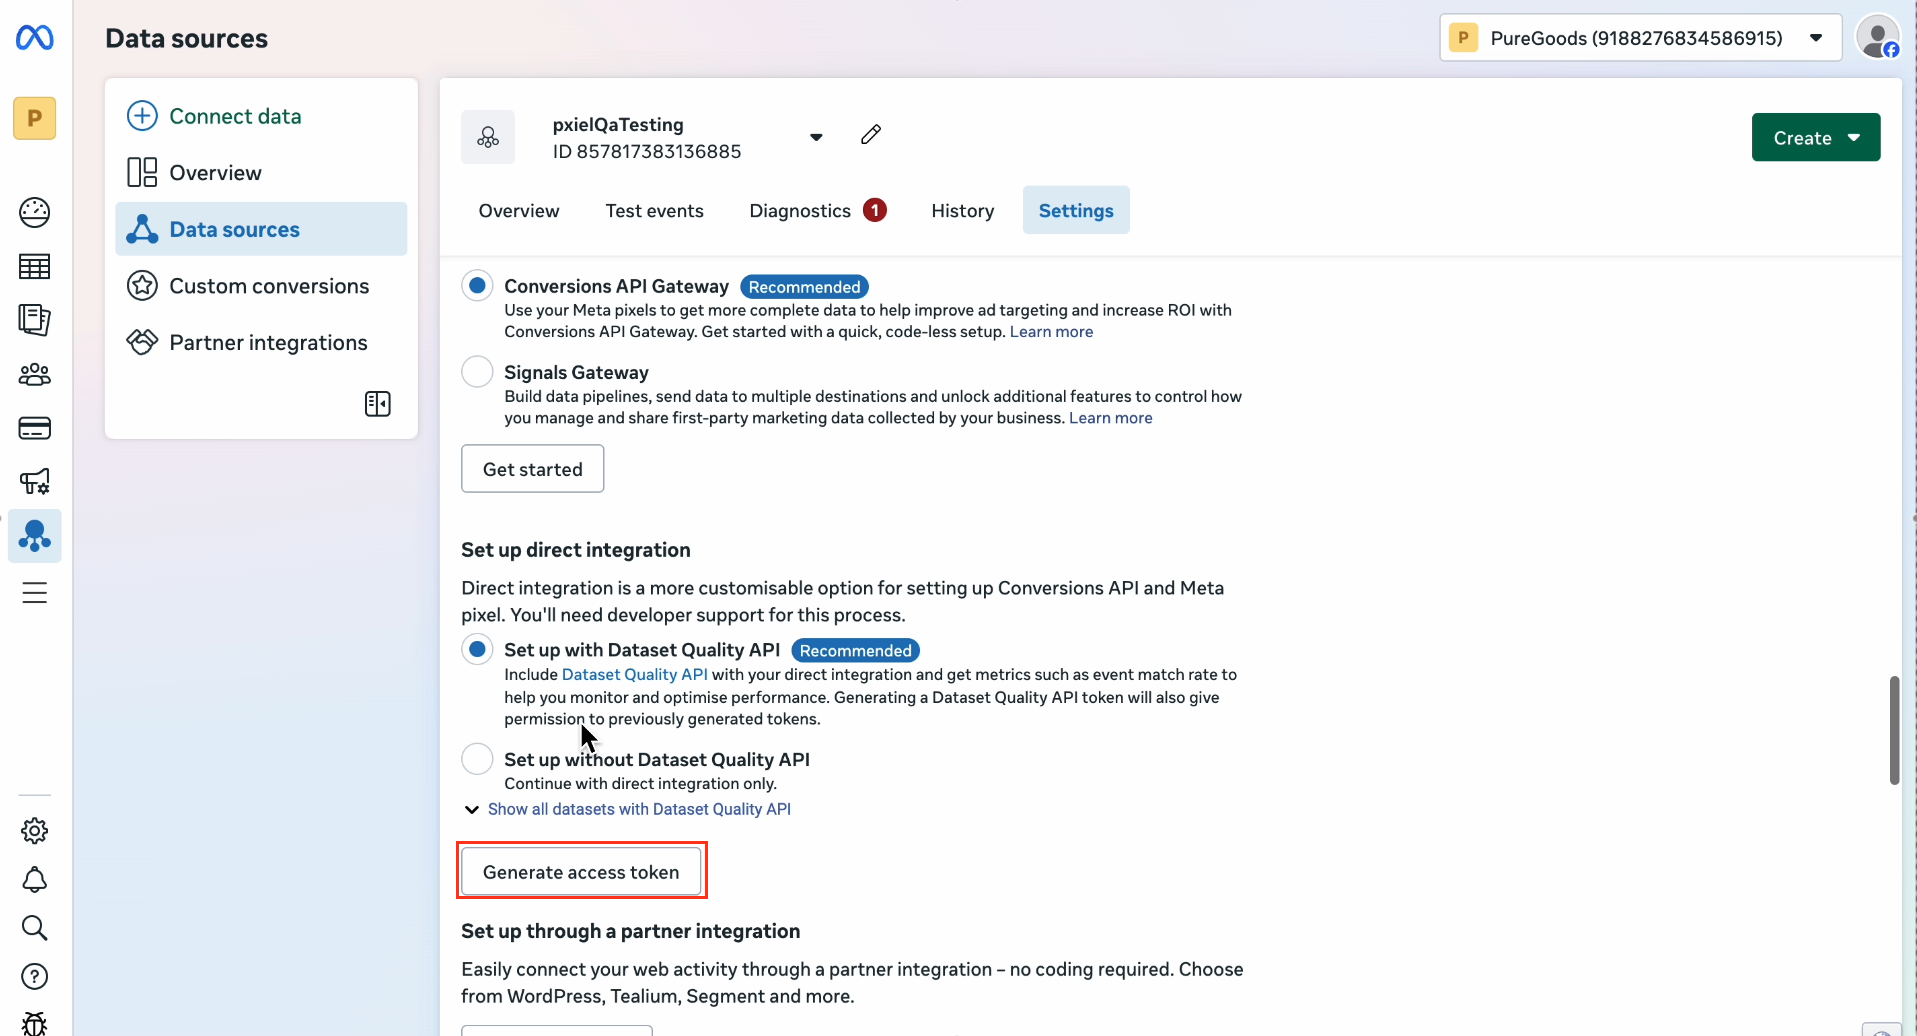
- In Cashfree’s configuration modal, enter the Pixel ID and Access Token.
- Select Save.
- Navigate to Data Source tab under Events Manager.
- Select your particular Pixel ID and click on Overview.
If you are a Shopify merchant using OCC, disable the purchase event in Cashfree Meta Pixel setup. This prevents double-counting if Facebook and Instagram sales channels are active in your Shopify store.

Mixpanel
Mixpanel
To set up Mixpanel integration, complete the following steps:
- Sign in to your Mixpanel account.
- Go to Project Settings.
- Copy the Project Token.
- Enter it in the Cashfree configuration modal.
- Select Save.
Linking with ad platforms
You can link your analytics platforms with advertising platforms to enhance tracking and optimisation.GA4 + Google Ads
GA4 + Google Ads
Link Google Ads and GA4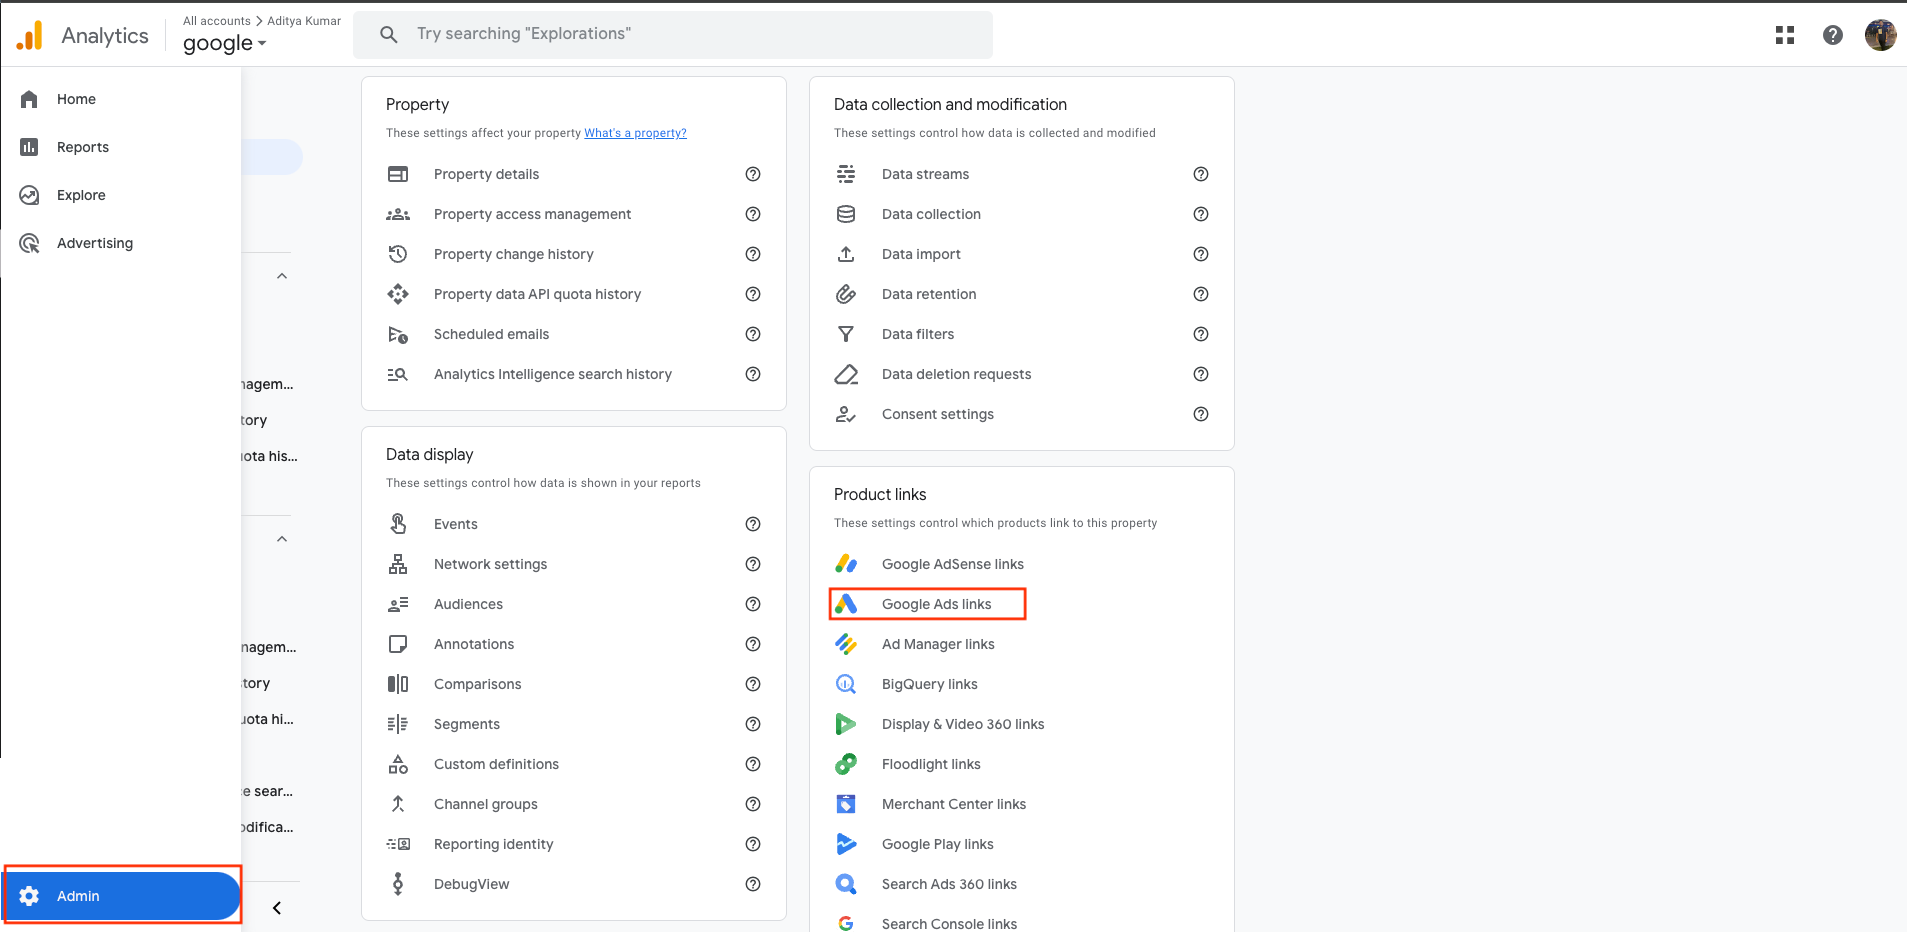

Step 1: Mark the purchase event as a conversion in GA4
GA4 imports only events that are marked as key events. Mark the purchase event as a key event before you import it into Google Ads.- Sign in to your GA4 property.
- Select Admin (bottom-left).
- Under Data display, select Events.
- Find the purchase event in the list of collected events.
- Check for the star icon to confirm the purchase event is marked as a key event (purchase events are usually marked by default).
Step 2: Link Google Analytics 4 to Google Ads
Linking creates the connection that lets data flow between the two platforms.- In your GA4 property, open Admin.
- Under Product links, select Google Ads links.
- Select Link (top-right).
- Select Google Ads accounts and pick the account(s) you want to link.
- Select the checkbox next to the account and select Confirm.
- On the next screen, ensure Enable personalised advertising and Enable auto tagging are turned on (they should be on by default). Keep both enabled where possible.
- Personalised advertising lets you use GA4 audiences for remarketing in Google Ads.
- Auto tagging adds the gclid parameter to your ad URLs so GA4 can attribute clicks and conversions to Google Ads campaigns.
- Select Next, review the settings, then select Submit.
Step 3: Import the purchase conversion into Google Ads
After linking and once data has synced, import the GA4 conversion into Google Ads.- Sign in to your Google Ads account.
- From the left menu, select Goals.
- Under Conversion, select Summary.
- Select + Create conversion action.
- Select Import.
- Select Google Analytics 4 properties, select Web, then select Continue.
- Select the purchase event (or other conversions you want to track) from the list of GA4 key events.
- Select Import and continue, then select Done.
Step 4: Configure the purchase conversion in Google Ads
- On the Conversions summary page, find the purchase conversion you imported.
- Select the conversion name to edit settings.
- Set Value to Use the value from Google Analytics so the purchase amount is passed into Google Ads dynamically.
- Set Action optimisation to Primary action so Google Ads can use this conversion for bidding optimisation.
Changes to conversion tracking apply only to future orders and events and won’t be applied retroactively to historical data. Allow up to 48 hours for the new conversion data to appear in GA4 and Meta reporting dashboards.
Meta Pixel + Meta Ads
Meta Pixel + Meta Ads
Once you have configured Meta Pixel integration with Cashfree, you can link it with Meta Ads Manager to enhance your advertising campaigns with conversion tracking and optimisation.
Prerequisites
Before linking Meta Pixel with Meta Ads, ensure you have:- A configured Meta Pixel with Cashfree integration
- An active Meta Ads Manager account
- Admin access to your Meta Business account
Step 1: Access your Meta Ads Manager
- Sign in to Meta Ads Manager.
- Navigate to Events Manager from the main menu.
- Select your configured Pixel from the Data Sources list.
Step 2: Verify pixel events
- In Events Manager, go to your Pixel’s Overview tab.
- Verify that Cashfree events such as
purchaseandInitiateCheckoutare appearing. - Verify event data quality using the Diagnostics tab.
Step 3: Create custom conversions
- In Events Manager, select Custom Conversions from the left menu.
- Select Create Custom Conversion.
- Define conversion rules based on Cashfree events:
- For purchase tracking: use the
purchaseevent - For checkout initiation: use the
InitiateCheckoutevent - For payment info collection: use the
AddPaymentInfoevent
- For purchase tracking: use the
- Set conversion values and attribution windows as needed.
- Save the custom conversion.
Step 4: Use conversions in Meta Ads campaigns
- In Meta Ads Manager, create or edit a campaign.
- In the Optimisation & Delivery section, select your custom conversion as the optimisation goal.
- Set appropriate bid strategies based on your conversion objectives.
- Launch your campaign to begin using Cashfree conversion data for optimisation.
Step 5: Monitor performance
- Use Ads Reporting to view conversion metrics from Cashfree events.
- Monitor attribution data in Events Manager to understand the customer journey.
- Adjust campaign targeting and bidding based on Cashfree conversion insights.
Verification and troubleshooting
- Allow up to 48 hours for new configurations.
- Ensure IDs and tokens are correct.
- For Shopify merchants, disable duplicate purchase events.
- Use provider-specific real-time or debug views.
If you are a Shopify merchant using One Click Checkout, disable the purchase event in Cashfree Meta Pixel setup. This prevents double-counting if Facebook and Instagram sales channels are active in your Shopify store.
FAQs
I am not able to see events in the Meta Pixel Helper (Meta Pixel Ad Helper). Why?
I am not able to see events in the Meta Pixel Helper (Meta Pixel Ad Helper). Why?
Browser-side events are not currently supported. The Meta Pixel Helper extension only detects browser-side events.Cashfree External Analytics integration supports server-side events only, which are pushed directly to the Meta Events Manager dashboard instead of the browser. As a result, events do not appear in the Meta Pixel Helper, but they are visible in the Meta Events Manager dashboard.
How long does it take for events to appear in Meta Pixel?
How long does it take for events to appear in Meta Pixel?
- After configuration in the Merchant Dashboard, events may take approximately 30 minutes to 1 hour to appear in the Meta Events Manager.
- It may take 24–48 hours for the same events to become visible in Meta Ads reporting.
What should I do if I am receiving duplicate events in Meta Pixel?
What should I do if I am receiving duplicate events in Meta Pixel?
If you are receiving duplicate purchase events in the Meta Events Manager, events may be getting triggered from multiple sources.To avoid duplication, disable the
purchase event from the Cashfree Merchant Dashboard. This prevents Cashfree from sending the purchase event and resolves the duplication issue.